What is the ‘CRITICAL_PROCESS_DIED’ error?
The occasional Blue Screen of Death (BSoD) has plagued us all over the years of Windows’ existence. BSoDs are STOP errors that are a part of the Windows operating system. These messages are displayed when a fatal system error happens, with the primary purpose being to inform the user about the cause of the error so they can figure out potential fixes. Typically, BSoDs occur due to faulty memory, overclocking, bad drivers, corrupted storage or even badly written software.
One such BSoD that often occurs when Windows 10 boots up is the ‘CRITICAL_PROCESS_DIED’ error. The critical process died error indicates that a program integral to the working of the operating system died due to some issue or error. In older versions of Window, the error is accompanied with the error code ‘0x000000EF’. This code is one of the 500+ known BSoD error codes and refers to the ‘CRITICAL_PROCESS_DIED’ error.
In Windows 10, the critical process died error is shown with a blue screen with an accompanying vague error message “Your PC ran into a problem and needs to restart. We’re just collecting some error info, and then we’ll restart for you. If you’d like to know more, you can search online later for this error: CRITICAL_PROCESS_DIED”. On restart, most cases end back at the dreaded blue screen with the same terrible error.

Why is this error message displayed on my computer?
The critical process died error happens when unauthorised accesses to data owned by a critical component are made during boot up. When Windows detects such a modification, then it immediately kills the process that was modified resulting in the Critical Process Died BSoD. In 90% of the cases, the problem arises due to a bad driver. If you recently installed or updated a driver for some hardware (printers, controllers, sound cards. etc) then chances are that’s the culprit. But sometimes the root cause of the issue isn’t as simple. People have reported the Critical Process Died error happening on brand new machines and devices. But worry not! We’ll discuss multiple methods that would cover most scenarios and possible issues.
The methods described are very simple and should be very easy to follow even if you are no computer expert. We recommend trying out every method one after the other and reboot to check if the BSoD still appears.
How do I fix the Critical Process Died error in Windows 10?
If you’re in a boot loop and your computer can’t seem to get out of the Blue Screen of Death, then the first step is to boot your computer in Safe Mode. In Safe Mode, Windows only starts with a limited set of files, programs and drivers. Startup programs don’t run and only basic drivers needed to run windows are installed.
Start your computer in Safe Mode
There are multiple ways to boot your computer into Safe Mode. Most computers detect the F8 key or the Shift + F8 keys pressed before startup to open the Advanced Boot Options Menu. To use this method, perform the following steps:
- Restart Windows 10.
- Press F8 or Shift+F8 before Windows 10 starts loading so that you enter recovery mode. (Pro tip: Keep pressing the keys until you arrive at the recovery. Try both F8 and Shift+F8 on separate restarts if one doesn’t work)
- Use the arrow keys to select the Advanced Boot Options and click Enter.
- Use the arrow keys to select Safe Mode and click Enter. You could also use Safe Mode with Networking but that isn’t recommended since your wifi chipset’s driver itself could be the culprit.

If your computer is one of the unfortunate devices that does not map F8 or Shift+F8 to recovery (my own personal laptop does not) do not give up just yet. There is another way to enter Safe Mode:
- If you have a Windows installation disc or a Windows recovery USB then you can insert it before startup to boot into WinRE. If you don’t have an installation disc or USB then just restart your pc several times to automatically boot into WinRE. WinRE is an inbuilt repair tool that allows you to troubleshoot if your operating system is facing problems.
- Once you’re in WinRE, click Troubleshoot.
- Then, click on Advanced Options.
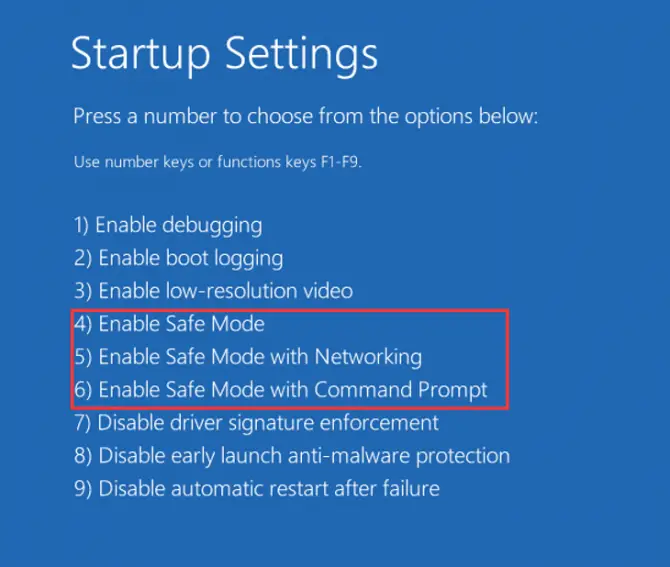
- Click on Startup Settings.
- And finally, click on Restart. Once your computer reboots, you will go back to WinRE. Navigate to the Startup Settings menu as we’d done in steps 2-4.
- Here, you’d find multiple restart options. Press the appropriate number key (4 in my case) to reboot into Safe Mode.

If you still can’t boot into your PC, then the underlying problem is very severe. You would have to reinstall Windows to fix the issue. If your computer boots and you’re able to log in to your account, then we now need to perform a Clean Boot. A clean boot is similar to booting with Safe Mode, but it provides you with much more control over which services and programs run at startup to help you isolate the root cause of the issue. A clean boot is also much simpler to perform and you wouldn’t have to keep entering recovery to do it unlike booting in Safe Mode.
Perform a Clean Boot
These steps may look convoluted at first glance, but following them, step-by-step would keep you in track to perform a clean boot.
- Sign in to the computer as an administrator.
- Click the search button next to the Windows icon in the taskbar. Type ‘msconfig’ and select System Configuration from the results shown.
- Click on the Services tab in the top bar, select Hide all Microsoft services, and then select Disable all.

- Then, click on the Startup tab and select Open Task Manager.

- Under Startup in Task Manager, for each startup item, select the item and then select Disable.

- Close the Task Manager, select OK in System Configuration and restart your computer.
Your computer should now boot successfully into Windows. From here, there are multiple things that you could do to find the root cause of the issue. If the problem started arising after a system update or a new driver installation and the system was working fine before this, the easiest solution to get rid of the Critical Process Died error is to restore your computer to a previous state. You could also manually remove the software or driver if you’re aware of what exactly caused the problem. If you aren’t then you could use System Restore to an automatically created backup that Windows created before every major update.
Perform a System Restore
A system restore is NOT a system reset. You would not lose any personal files such as documents, music, pictures, videos, etc. But some applications that you’d installed after the backup would no longer be present. A system restore is literally reverting your computer to a previous point in time.
To perform a system restore, you need to do the following steps in order:
- Click on the search icon next to the start button and search for “Create a restore point”.
- Click the top result to open System Properties.
- Click the System Restore button in System Properties.

- A new dialog box would open with the title “System Restore”. Click Next.
- Select the restore point that you want to use on the computer. You could also choose to Scan for affected programs to figure out which applications would no longer be present.

- Click the Next button.
- Click the Finish button.
Once you perform the steps mentioned, your computer would be returned to a previous working state. It should no longer have the ‘CRITICAL_PROCESS_DIED’ error and your computer should work normally. If a system restore didn’t work either, you’d need to redo the steps to boot into safe mode and clean boot. You could try restoring to an older point or you could perform a System Reset to have a clean, new working PC.
Use the System File Checker (SFC) to fix corrupted system files
The ‘CRITICAL_PROCESS_DIED’ error could also be caused due to corrupted system files. Fortunately for us, Windows ships with a System File Checker (SFC) tool that would allow users to scan for corrupted system files and restore them to their original state. The tool looks for all files that fall under Windows Resource Protection (WRP). WRP prevents the modification of files, folders and registers that are integral to the operating system.
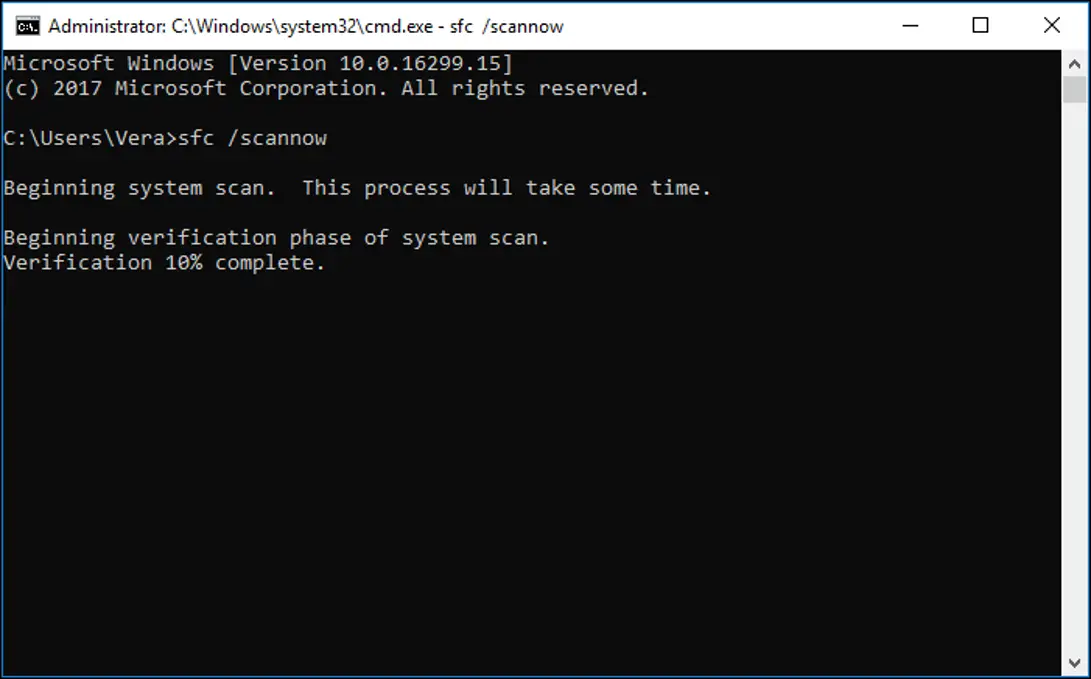
- Click on the search button next to the Windows icon and type “command prompt”. Then, right-click the Command Prompt result and select Run as administrator. This would open a new command window.
- In the command window, type ‘sfc /scannow’ without the quotes and press the enter key. The scan will take some time to run.

The SFC will automatically find any corrupted files and repair them. If it does perform any repairs you’ll get a message saying “Windows Resource Protection found corrupt files and successfully repaired them. Details are included in the CBS.Log windir\Logs\CBS\CBS.log. For example C:\Windows\Logs\CBS\CBS.log. Note that logging is currently not supported in offline servicing scenarios”. - Restart your computer.
With that, you’ve successfully repaired your system files and your computer should work normally.
Note: If you run into an SFC /Scannow error when starting the scan, don’t worry. We have written dedicated articles on what to do if SFC scannow is not working, including:
- Windows Resource Protection Could Not Perform The Requested Operation
- Windows resource protection could not start the repair service
Conclusion
The above-described solutions should solve 99% of the cases of the ‘CRITICAL_PROCESS_DIED’ error in Windows 10. Rebooting into Safe Mode and Clean booting is a necessary step to troubleshooting your computer. You can perform a system restore or use the SFC tool to repair corrupted files to fix your system. Furthermore, the same methods could be used to solve many other Blue Screen of Death (BSoD) issues in Windows 10.
Did you know that none of this works if the system cannot be started at all? I have a computer here that displays ‘CRITICAL_PROCESS_DIED’ when it starts up. If I try to reboot into safe mode, same result. Can’t do clean boot if the system won’t boot. And on and on. Maybe you should come over here and look at this laptop and help me figure out a REAL solution!
Of course, Microsoft is to blame for not displaying error messages that are actually helpful. Give me a clue! WHICH critical process died?
AMENNNNNN! Help! Did you figure out how without having to call support?
Sooo… 🤬
My computer just keeps looping blue screen. I can’t safe mode, restore or repair. When I get into command prompt, I try the sfc scan now and it will not perform on both drives, and won’t leave the blue choose an option page no matter what I do or goes back to critical process died and won’t fix. I can’t save mode or anything. It sounds like I need to reinstall windows 10 again… it was having memory issues before that all went downhill.. If I load it normally it just sits at a black screen.. help.
At this point if you can’t do anything; reinstall windows. Insert the CD or USB you got. USB is easy to make with the iso file for windows and Rufus USB program.
Start it up, custom install cause your gonna have to. Delete the system reserved system and the partition. Click New on the bottom right and contemplate on your deleted files while your PC goes back to normal.
If its not the software (windows 10), its the hardware (your pc parts). Software is easy, hardware not at all easy to troubleshoot.
Same as Sophia’s comment here. Windows 10 32-bit. Reloading with 64-bit but most of my bookmarks are GONE. I’ll keep a backup of 32-bit IF someone comes up with a solution.
Same as u guys. Critical process died.. then all gone to black screen with “acer” logo? A 2 month old Lap top.. I had to carry it back to Pricemart…. awaiting response from them…
Got as far as performing the administration scan – message I received is windows resource protection could not perform the requested operation …so now what’s the next step to take ?
Take a look at this article for more info on that message: https://www.troubleshootingcentral.com/fix-windows-resource-protection-could-not-perform-the-requested-operation-sfc-scannow-error-message/
Aug 22 – HELP REQUEST from James Fors!! Critical_Process_Died windows 10
Greetings, I’m in desperate need of help and hope I can lean on your expertise for a resolve-remedy of sorts as I am stuck with error; “critical_process_died windows using this laptop; “Lenovo YOGA 73015IWL”
Stuck in Automatic Repair mode thus booting into the Blue Screen troubleshoot page.
I’m able to open all fix-it options in advanced mode ie Startup Repair, System Restore & all the rest.
Unable to start any Fix Processes being blocked by Bios Password, no matter which option selected?
The User Password has the same exact issue saying it’s the wrong password, huh?
I’ve managed to Reset Password on the same platform, again, wrong password, corrupt it is?
Why is it asking for a password for all various options & then says it’s the wrong password?
I go in the same circles over & over again with the exact results.
I’m unable to access any method to fix the critical process errors with NO Access?
Please guide me through a fix for this blue maze of options to boot this Laptop without any password necessities, User or Bios or ? Power up and boot right into a functional computer on all levels w/o any password requirements on all levels, thank you so much. Remain well in peaceful balance to take good care of it all…
My Best Regards,
James Fors
It best to call a local computer repair technician with such a serious issue. They will have the tools and the knowledge to fix your laptop.