When you press the power button on your computer, you expect your computer to boot quickly and without issues. When your computer starts, the Windows OS loader launches critical drivers and the Windows kernel so the boot process can continue. If you’re having recurring boot problems associated with a “Fixing C Stage 1” or “Fixing C Stage 2” error message that causes very long boot times, this guide can help. You’ll learn about the Windows boot process, the CHKDSK utility, and step-by-step directions to fix this problem.
What does Fixing C Stage 1 or Fixing C Stage 2 mean?
Fixing C Stage 1 is an error message that can occur during Windows startup on any type of PC or laptop, including popular brands like HP, Dell, Lenovo, and Asus.

This error message usually reads something like this:
Fixing (C:) Stage 1: 2% (11149 of 511320); Total 1%, ETA 02:45:00
Fixing C Stage 2 is another message that can display during Windows startup. This error message usually reads something like this:
Fixing (C:) Stage 2: 3% (17089 of 512680); Total 23%, ETA 01:22:00
These messages tell you that the Windows operating system is checking your hard drive for errors. The program that is checking your disk is called CHKDSK. Usually, CHKDSK doesn’t even complete a full scan, and Windows will continue to boot, but sometimes the system gets stuck, and the ETA can increase to display a crazy time to finish.
The letter (C:) in the text shows which hard disk is being checked, it’s the C drive in this case. As such, the message on your screen might show a different drive letter, like Fixing D Stage 1 or Fixing E Stage 1. These all indicate the same problem, just on different hard drives.
The Windows boot process
When Windows is booting, it walks through different phases:
- Preboot – In this stage, firmware settings are loaded, and a valid hard drive is identified. Then, the Windows Boot Manager is started.
- Windows Boot Manager – It locates and starts Winload.exe on the boot partition located at %SystemRoot%\system32\winload.exe
- Windows Operating System Loader – Windows kernel is started using the kernel image file located at %SystemRoot%\system32\ntoskrnl.exe
- Windows NT OS Kernel – The kernel loads the registry and any necessary drivers until Smss.exe takes over
If Windows experiences issues during boot, a variety of boot errors are possible. In the case of Fixing C Stage 1 or Fixing C Stage 2, Windows found an issue with the hard disk and started CHKDSK.
What is the CHKDSK Utility?
All modern versions of Windows, from Windows 11 down to Windows XP, includes a program known as Check Disk utility, or simply CHKDSK. CHKDSK’s job is to scan your file system and fix any corruption or logical file system errors. Check Disk also looks for bad sectors of your hard drive. This can be from damage to the drive or poorly written data. Sectors with drive damage are marked for no further use by the Check Disk utility.
CHKDSK has many modifiers that you can use to adjust CHKDSK’s scans. The two most common modifiers are fix and repair, noted by /f or /r:
- CHKDSK /f – Scans the hard disks and tries to repair overhead files. Quicker scan times.
- CHKDSK /r – Scanning takes significantly longer because it’s scanning each individual sector of the drive, looking for corruption AND physical damage. /r includes all /f scan functions.

The problem most users have with CHKDSK is it’s extremely slow. A full disk scan can take hours, and your computer is not usable during this time. If the Fixing C Stage 1 or Fixing C Stage 2 issue occurs randomly when you boot your computer, this can be a major hassle.
What causes the Fixing C Stage 1 or Stage 2 error messages during Windows boot?
Fixing C Stage 1 and Fixing C Stage 2 is about your hard drive, so the causes behind this issue are all linked to your disk and its health. Windows will try to check the disk during Startup for the following issues:
- Read/write errors
- Hardware damage
- Too many bad sectors
- Failing hard drive
- Power failure
How to skip or cancel Fixing C Stage 1 or 2?
Many users have asked how to skip or cancel the Fixing C Stage 1 or Stage 2 screen. If you are one of the unlucky ones and your system gets stuck, you’ll have no option but to follow solution one below to even get past this message.
If your computer is actively checking the disk and the ETA is going down and has not inflated to ridiculous numbers, you should try to let the scan finish. It’s inconvenient, but shutting down your computer to avoid the scanning process can cause more problems. It’s not recommended to try to skip or cancel Fixing C Stage 1 or Stage 2 UNLESS your system is completely unresponsive and not making any progress.
Proven solutions to resolve Fixing C Stage 1 and Fixing C Stage 2 errors
1. Manually restart your computer
Sometimes the “Fixing C Stage 1” or “Fixing C Stage 2” message won’t clear on its own, and your computer won’t continue to boot. You are waiting for hours or even a full day. In this situation, you may have no other choice but to manually restart your computer to force a skip or cancel of (C:) Stage 1 or (C:) Stage 2 fixing.
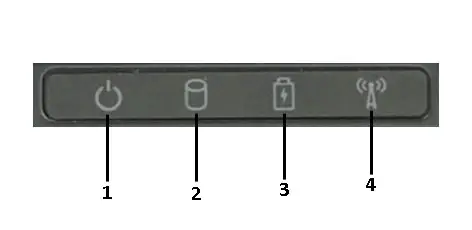
Note: Generally, it is a BAD idea to interrupt disk scanning in stages 1, 2, or 3. It is much safer to interrupt disk scanning in stages 4 and 5. If you are forced to interrupt during stages 1, 2, or 3, check the hard drive light on the front or top of your computer. The HDD LED is an indicator for disk activity and is usually denoted with a cylinder symbol (#2 in the image below). If this LED keeps lighting up, then your disk is still actively being scanned. If the LED stays off, then this is the best situation if you are forced to restart the computer during the first three stages.

To manually restart your computer, you need to press and hold the power button for a few seconds until it powers down. Wait a few seconds until all lights are off and fans have stopped. Then press the power button again to restart. This method is pretty standard across all computers, including brands like Lenovo, HP, Dell, Microsoft, and Asus.
2. Change autocheck in Registry Editor
All Windows operating systems use the Windows Registry. Windows Registry stores important Microsoft Windows configuration settings in a hierarchical database formatted like a tree. Data in the Windows Registry may be stored with keys, key and value pairs, or keys, subkeys, and values.
Warning: Generally, editing the Registry is not recommended if you are not familiar with computers, databases, or Windows. If you make incorrect changes to the Registry, you can cause major data loss or corruption. Therefore, be sure to follow each step carefully, referring back to this guide often.
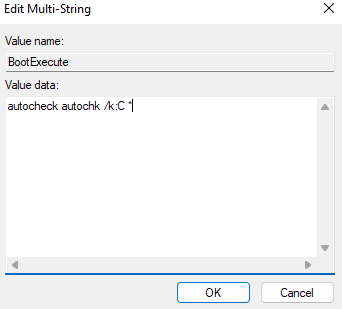
To stop the Fixing C Stage 1 or Fixing C Stage 2 issues on Windows startup, you will be navigating to the Registry Editor and finding Session Manager so that you can change “autocheck autochk *” to “autocheck autochk /k:C”.
- Press the Windows key + R to open Run. Next to Open, in the search bar, enter “Regedit”. Press OK. Depending on your permissions settings, you may see a pop-up asking if you want to allow Registry Editor to make changes to your device. Click Yes.

- When Registry Editor opens, it will look something like the image below. The left-hand pane is used for navigation, and the right-hand pane is for values and editing. Find the address bar right under the menu. In the picture below, the address is set to Computer.

- You need to replace whatever is in the address bar with the following:
HKEY_LOCAL_MACHINE\SYSTEM\CurrentControlSet\Control\Session Manager

- On the right-hand side, you will see a list of entries. Find Boot Execute and double-click to open the Edit Multi-String window.

- Replace the Value data entry of “autocheck autochk *” with “autocheck autochk /k:C *”. Click OK to save.

- Close the Registry Editor and restart your computer. Hopefully, the problem is fixed, but if not, you can continue to the next solution.
3. Run CHKDSK from the Command Prompt
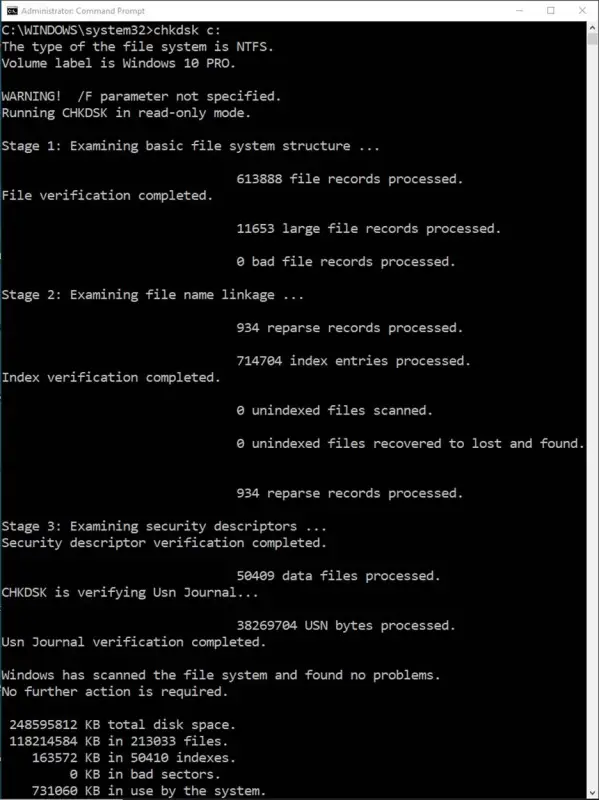
You learned about the CHKDSK utility and what Windows is doing behind the scenes when you see the Fixing C Stage 1 or Fixing C Stage 2 messages, but now you’re going to use it yourself.
If this message pops up during Windows startup on your Dell, HP, Asus, or Lenovo laptop, it’s a good idea to go ahead and plan to run CHKDSK yourself to check for hard drive issues. You may need to plan this around a day where you will be home but do not need to access your computer.
To run CHKDSK, follow these steps:
- For Windows 7, 8, 10, or 11, click the Windows key or press the Start icon to open Windows search. Type “Command Prompt” into the search bar. Under the Command Prompt app result, select Run as Administrator.

- Depending on your permissions settings, you may see a pop-up asking if you want to allow Registry Editor to make changes to your device. Click Yes.
- Within the Command Prompt window, type the following command and press Enter:
chkdsk c: /r - Command Prompt may ask to schedule the disk to be checked with the following message:
“Chkdsk cannot run because the volume is in use by another process. Would you like to schedule this volume to be checked the next time the system restarts? (Y/N)“ - Enter “Y” to respond yes and press Enter. The Command Prompt will display another message:
“This volume will be checked the next time the system restarts.“ - When you are ready to proceed with the scan and can dedicate at least the next 4-12 hours to a disk scan, then restart your system. CHKDSK will scan your entire hard drive, looking for corruption and damage.
Fixing C Stage 1 and Fixing C Stage 2 issues solved
You’ve learned about the Windows boot process and what the CHKDSK utility is for in hopes of fixing a bothersome message during startup. You learned three methods to remedy this problem permanently, starting with manually restarting your computer, editing your registry, and then scheduling the full CHKDSK scan on startup.
Hopefully, these solutions have fixed your problem, but if not, it may be time to consider an HDD replacement, as it may be too corrupted to recover.
Most new computers today are built with Solid State Drives (SSD). SSDs are an all-around hardware upgrade over legacy HDDs. SSDs are quieter and much quicker in reading and writing data to the drive, but another great improvement is the durability. Hard drive disks are susceptible to corruption and damage because the drive spins so closely to the read/write head. HHDs can experience a head crash if jarred while reading/writing or if dust enters the drive.
If your HDD is compromised and you are still experiencing issues with Fixing C Stage 1 or Fixing C Stage 2, it may be time to upgrade. Thankfully SSDs are very affordable and are definitely worth the investment.