When we boot up our Windows 10 computer, whether it is a laptop or desktop, one of the first things we expect is to hear sound. Unfortunately, a lot of Windows users are running into an error that causes Windows audio services to fail. Most users will report having a little red “x” on their sound icon located in their taskbar and when hovered over, will see the “audio service is not running” error message. This simply means that your sound device is not responsive and needs to be fixed.
What is the Root Problem Behind the Audio Error?
In the majority of cases, the root problem is that one of the dependencies that the Windows audio service relies on has become disabled or has failed to start automatically during the boot up process. A temporary fix is to restart your computer, but this can get tedious very fast. Instead, use the methods below to permanently get your audio back.
7 Ways to Fix the Error & Get Audio Back.
1. Change Your Computer’s Volume.
Yes, it sounds a bit silly but simply increasing or decreasing your computer’s volume may be enough to fix the issue. The reason for this is that if the audio isn’t running or working as it should, increasing or decreasing the volume will kick start the audio service into running

- If your sound icon in your taskbar has a red “x” on it, your audio service is not running. Click on the sound icon to get a volume slider to pop up.
- Use the volume slider to either decrease or increase your sound. Doesn’t have to be by a lot, but a few decibels will do.
- If the red “x” on the sound icon has disappeared, you should no longer get the “audio service is not running” error when you hover your mouse over the “x” as it will have disappeared.
Test your sound out now. It should be working as intended.
2. Restart Your Windows Audio Service & All Dependencies.
Sometimes stopping and restarting a program is an easy solution as it allows you to ensure that all components of the program are working in the order that they should be. If a dependency that the Windows audio service relies on, stops working, then restarting will help fix this.

- Open up your “run dialogue” box. You can either search up “run”, right-click your start menu and open from there or hit the Windows key on your keyboard and press “R”.
- Type in services.msc and hit the okay button.
- In the Services configuration window that pops up, find:
- the Windows audio service,
- the Windows audio endpoint builder service,
- and the multimedia class scheduler service, if it is available.
- Right-click on each of these, choose properties, and make sure that the startup is set to automatic.
- Once all are set to automatic on startup, you want to either click on each of them in the configuration window and hit restart or right-click them and hit restart.
From here, you can exit out of the window you are in and you should no longer see the “audio service is not running” error and the little red “x” should be removed from your sound icon in your taskbar.
3. Reinstall Drivers or Choose to Rollback or Update Them.
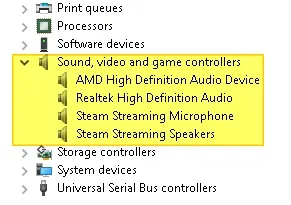
If you’ve recently updated your audio drivers, it is safe to reason that the problem could be from an incorrect installation or incompatible audio drivers. Any of these issues can prevent the driver from communicating with your hardware, causing there to be no sound. To reinstall, rollback, or update your drivers, you will need to use the device manager.

- In your Windows search bar (beside your start menu), search “device manager” and click on the application that comes up. You can also open the device manager by using the “run dialogue” box and typing in devmgmt.msc.
- In the device manager window, find the “Sound, video, and game controllers” option in the list and hit the arrow to expand it.
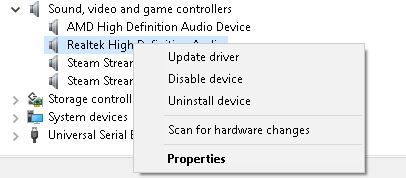
- Select the audio driver that you are using and right-click it. Hit the uninstall option.
- Once uninstalled, right-click again and choose the “scan for hardware changes” as this will prompt the re-installation of the audio driver.
- If the re-installation does not fix the issue, roll the driver back by right-clicking on it, hitting properties, and choosing the “rollback driver” from the driver details tab.
- If rolling back the driver does not work and reinstalling it does not work, right-click on the audio drive one last time and try updating it.

If updating the driver does not work, move onto another fix in this list.
4. Use the Troubleshoot Option in Your Windows Settings.
If you’ve put your computer through any manual or automatic hardware or software changes recently, the configuration setups from these could be causing the “audio service is not running” error. To find out if this is the case, use the “troubleshoot” option in your Windows settings.

- Either search for “settings” using your Windows search bar or hit the Windows key on your keyboard with “I” to bring the settings window up.
- Find the “update and security” option in the list and click it.
- Find the troubleshoot option from the left-hand menu pane and click it.
- Under the “get up and running” section, find the “playing audio” option and click it. Then hit the “run troubleshooter” for it.
Once the troubleshooter has finished, see if the issue persists.
5. Use the Command Prompt to Fix Local Account Configurations.
If you think that you’ve messed up local account configurations, you can use the command prompt tool to fix them and to automatically start the audio service.

- Search up the command prompt in your search menu and right-click it to run it “as an administrator”.
- Type in the following commands into the command prompt tool, hitting Enter after each one.
- net localgroup Administrators /add networkservice
- net localgroup Administrators /add localservice
- SC config Audiosrv start= auto
- REG ADD “HKLM\SYSTEM\CurrentControlSet\Services\Audiosr” /V start /T REG_DWord /D 2 /F secedit /configure /cfg %windir%\inf\defltbase.inf /db defltbase.sdb /verbose
See if the problem still persists.
6. Try Modifying Your Computer’s Registry [Advanced].
You can always see if the problem is in your registry. If it is, you can modify the registry to solve the issue. Please note that this should only be undertaken by users with the understanding that editing the registry can cause serious problems if done wrong. Here are the exact steps:
- Open up your “run dialogue” program again and type in regedit to open up your registry editor.
- Find the HKEY that is for your local system. It should read: HKEY_Local_Machine\System\CurrentControlSet\Services\AudioEndPointBuilder\Parameter.
- Find the ServiceDll. Look at the data column and if it reads %SystemRoot%\System32\Audiosrv.dll then this is what is causing the “audio service is not running” error.
- Replace the above value with %SystemRoot%\System32\AudioEndPointBuilder.dll
- Apply changes, close the registry editor, and restart your computer.

7. If You Are Using a Different User Account – Change the Log-on Settings.
While it would make sense for the audio configurations to be the same across all user accounts on a local computer, sometimes that’s not the case. To check to make sure that the audio is configured for the user account you are on, you will need to look at the log-on settings.

- Open up the “run dialogue” box and type in the services.msc command.
- Hit enter and in the new window that opens up, find the “Windows audio” service option. Right-click on it and hit properties.
- Find the “log-on” tab at the top and check mark the “local system account” option.
- Exit out and see if you still get the “audio service is not running” error. If you do, re-open the log-on settings using the above steps and instead, check the “account” option and type in “local service” in the box underneath it.
- Create a password for this and confirm it.
- Apply the changes.
- See if the problem still persists.
If you have exhausted this list of solutions and the problem still persists, you may need to see if there is a problem with your hardware. It could be the WIFI chipset in your motherboard giving you problems or an issue with an Ethernet port or WIFI LAN Card. To double check this, boot your computer into safe mode to rule out any third-party problems and if the problem still persists, have your hardware looked at by a specialist.