The internet is wonderful, so long as you’re able to connect. When it comes to internet connectivity problems, you are likely to experience one of two things. Either your computer shows that there is no internet connectivity at all or that there is a connection but that you can’t access the internet. For those on wireless connections, you likely see an error message that states: WiFi connected but no internet. In this article, you will learn what this error message means, what are the likely root causes behind it, and finally, what steps you can take to remediate the issue.
If you’re having this issue but with your Ethernet connection instead, please visit our guide on Ethernet Connected, But No Internet? Learn How to Fix This Common Yet Elusive Windows Error
What does the WiFi connected but no internet error message mean?
Let’s start with understanding the problem. The WiFi connected but no internet error message means that your device can connect to your local network, typically to your router or modem, but it cannot communicate with other systems, like websites or servers, on the internet.
Why do you see the WiFi connected but no internet error message?
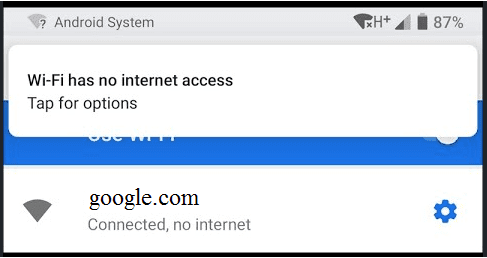
This error is characterized by a tiny, yellow warning triangle with a black exclamation mark on Windows computers and by a black exclamation mark on Android and iPhone devices. It is followed up by one of the following error messages:
- WiFi connected but no internet
- Connected, no internet access
- WiFi has no Internet Access
- No internet connection
When you see one of these error messages, it means that your device is connected to the local network (your router or modem), but something is blocking access to the internet. Common causes for internet connectivity issues include:
- Your computer’s WiFi adapter is faulty.
- Your internet service provider is down.
- Your computer has an incorrect internet protocol (IP) address.
- Security software is preventing access.
- Your wireless drivers are out of date.
- Your DNS server settings are configured wrong.
- Your DNS cache has become corrupted.
- Your router is faulty.
- You have an outdated wireless mode on your computer.
To solve this problem, we must determine if the issue is isolated to one device or if it is impacting the entire network. Knowing this information will determine what steps to take in order to resolve the issue.
Do you have no internet access only on one device or the entire network?
In order to figure out which resolution steps you need, you must determine if the “WiFi connected but no internet” error is impacting one single device or your entire local network. This check will help us narrow down the likely cause and then the correct method for solving your no internet access problem.
A single computer has a WiFi connection without internet
If your computer is the only device that says it has a connection but no actual internet, it is likely that you have a misconfigured setting, faulty drivers or WiFi adapter, DNS issues, or a problem with your IP address.
Try connecting to the same WiFi network with another computer or mobile device like an Android smartphone or an iPhone. If you can open websites and browse the internet on other devices, then you can be sure that the issue is isolated to your computer.
All devices have a WiFi connection but no internet
If all of your devices on the network have a WiFi connection but do not have access to the internet, it is likely that you have a problem with your router or modem. Alternatively, your internet service provider may be down.
While this is not always possible, but if you have a different WiFi network available nearby, try connecting to that network with the same computer. If you get internet access on another network, then it means that the problem is not with your device but instead with one of the network components.
In the section below, we are going to list out the solutions based on whether the no internet access issue is occurring on a single computer or whether it is a network-wide problem.
Proven solutions to the “WiFi Connected But No Internet” error message
If you are experiencing this error on a single device, follow the steps outlined in the methods below. If the issue appears to be with your network, move on to the next section.
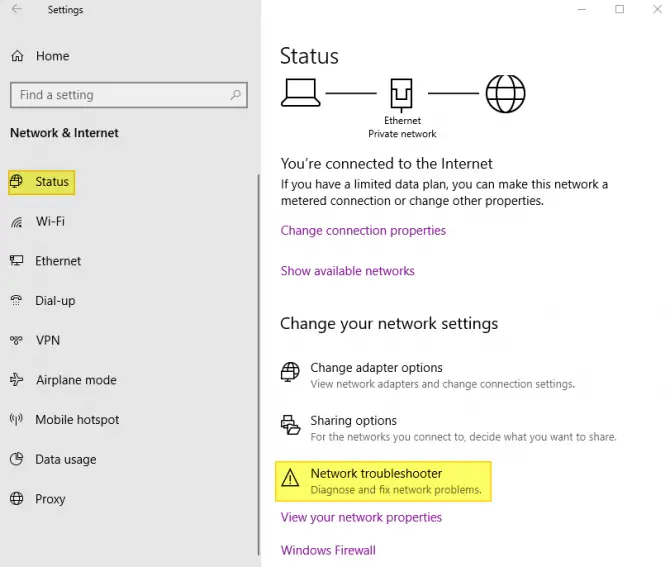
1. Use the Windows Network Troubleshooter
One of the first solutions to try is using the built-in Windows Network Troubleshooter. It has become a powerful tool to fix network connection issues and may be able to rectify your problem right away.
To run the network troubleshooter:
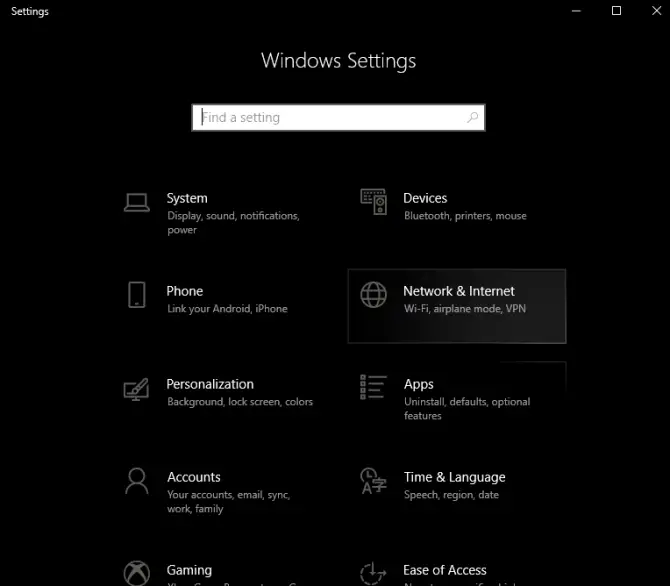
- Type in “settings” into your computer’s search bar.
- Click on the “network & internet” option.
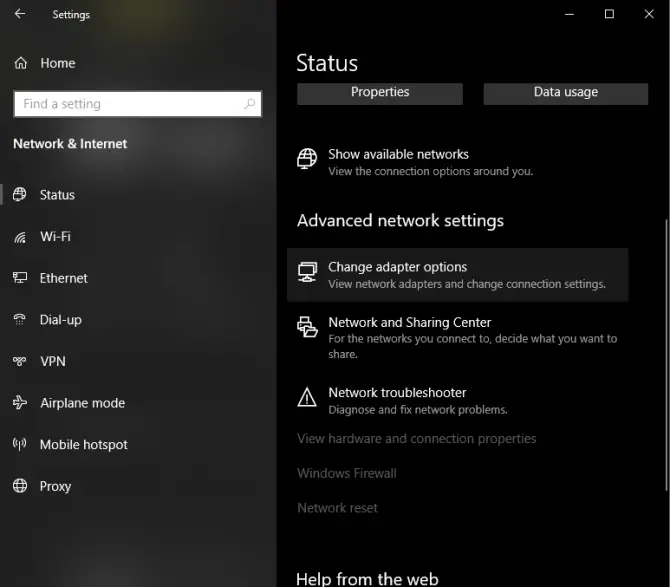
- In the left-hand menu, click on the “status” option.
- Click on the “network troubleshooter” option.
- Run it to see if it solves the problem. If it doesn’t, move on to the next method below.
2. Disable VPN
Virtual Private Networks (VPN) are great tools to improve your security on the internet. They can also allow you to appear browsing from another country which can be helpful when using services with regional differences. A good example is streaming services that have different content libraries based on your country.
At the same time, VPNs add an extra step when you connect to the internet, and if your VPN provider has a technical issue or outage, you can easily get a connected but no internet access error message.
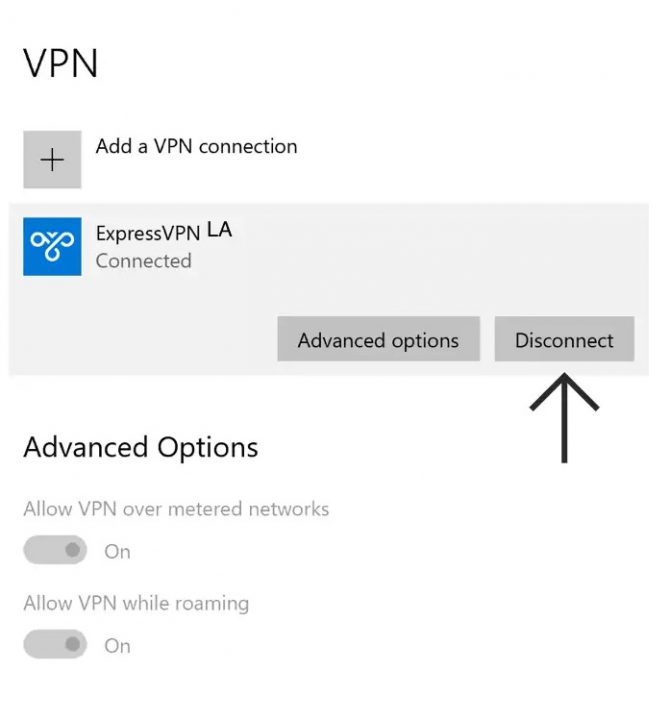
If you use a VPN, try disabling it to see if it solves the issue. Here is how to disable VPN on Windows:
- In your Windows search bar, type “Settings” and open the app.
- Click on the Network & Internet option on the screen that pops up.
- Select VPN from the menu on the left.
- Select the VPN connection you are actively using and hit the Disconnect button.
- Check if you can access the internet now.
Even if disabling the VPN did not solve your no internet access but connected issue, do not re-enable it just yet. You will want to find the root cause of the problem before you start adding back any component that interacts with your internet connection.
Keep your VPN disabled, and move on to the next method.
3. Disable proxy
Proxy servers are used as gateways between you and the internet. All of your network traffic needs to flow through the proxy server, which means that if your proxy fails, you can experience a number of connection issues, ranging from slowdowns to having no internet at all.
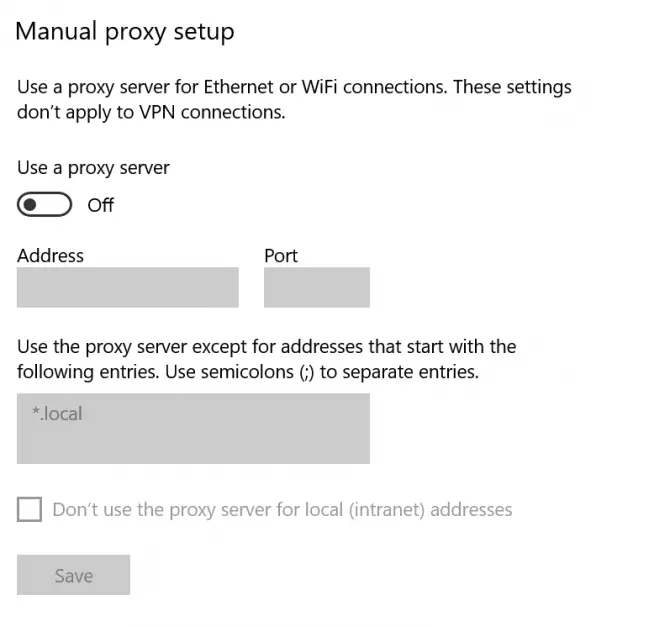
If you have a proxy server configured in Windows, disable it to rule out proxy as a potential source of the problem.
- Type “Settings” in the Windows search bar and open the app.
- In the new window that opens, click on Network & Internet.
- Select Proxy from the menu on the left.
- Scroll down to the Manual proxy setup section, and make sure that the Use a proxy server toggle is off.
4. Check time synchronization
Opening a website in your browser seems to be simple, but in reality, a surprisingly long chain of actions needs to be completed by your computer and other systems on the internet for it to happen. Every communication event between your computer and the internet includes a timestamp that helps keep the order of processes. If your computer’s internal time is different from the internet time, that will cause a wide array of issues and leave you without internet.
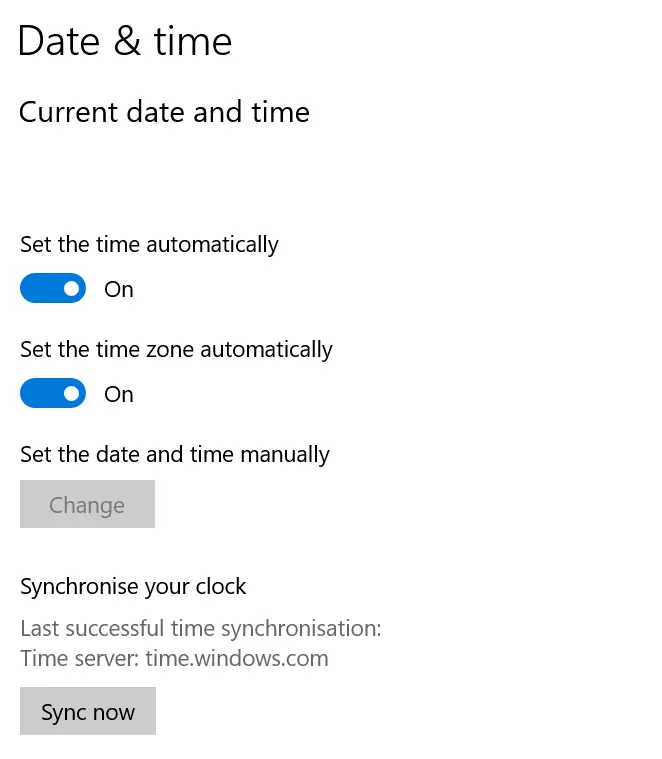
Here is how to set your time to automatic on Windows:
- Right-click on the clock that’s located at the bottom right of the taskbar.
- From the menu that opens, select Adjust date/time.
- Ensure that the Set the time automatically is ON, and the Set the time zone automatically is ON as well.
- Click on the Sync now button.
- Check if you have internet access now.
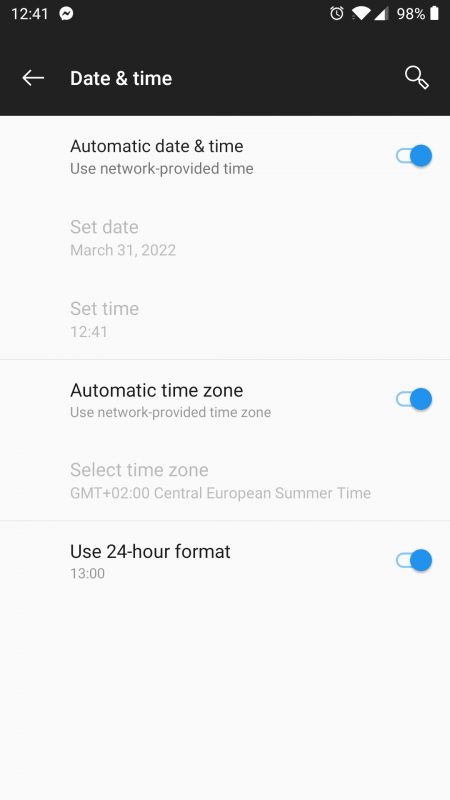
Here is how to set the date and time automatically on an Android smartphone:
- Open your Settings app.
- Select the System option from the list that shows up.
- Next, click on Date & time on the System screen.
- Make sure that the Automatic date & time option is ON, and that the Automatic time zone is ON as well.
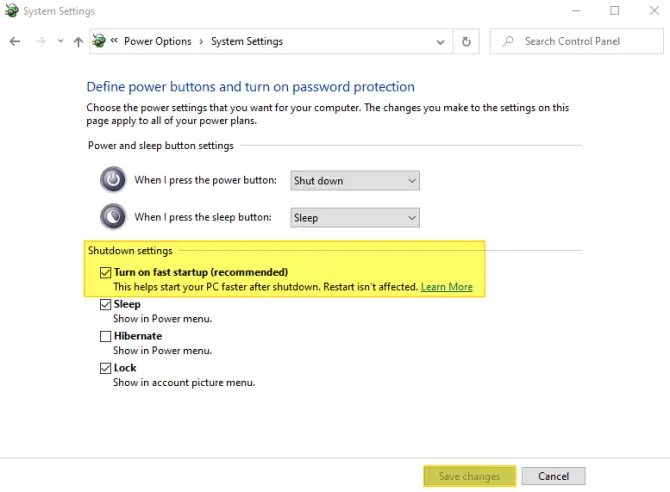
5. Disable Fast Startup
If you use the Fast Startup feature to shut down and power on your computer quicker, this may be interfering with your connection. To disable this, do the following.
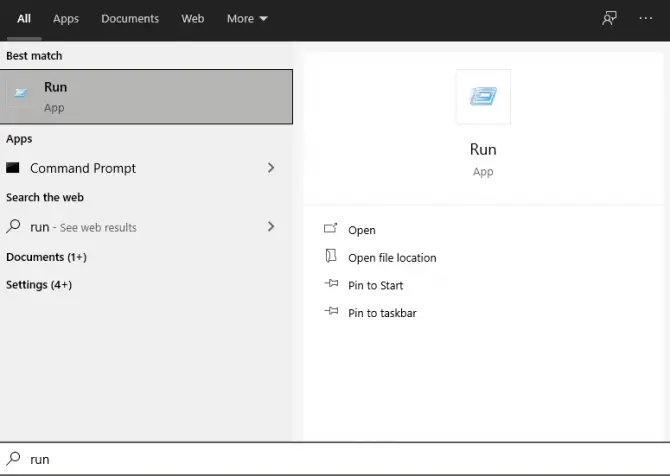
- Open the Run dialogue box by pressing the Windows Key + R. Or type “run” into your computer’s search bar and open the corresponding result.
- Type in the following command “powercfg.cpl” and hit okay.
- It opens the “power options” menu.
- On the left-hand side, click on the “Choose what power buttons do” option.
- Under the “define” section, tap on “Change settings currently unavailable.”
- Under the “shutdown settings” section, you will see an option for fast startup.
- Uncheck the fast startup option and hit save.
- Restart your computer and see if you have internet access.
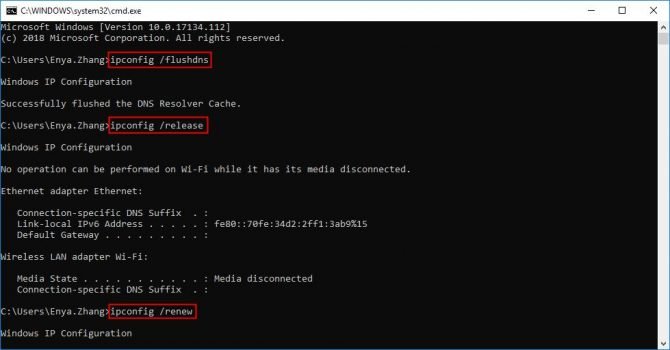
6. Flush your Domain Name System (DNS) cache
If your DNS cache becomes corrupted, either by malicious code or by technical glitches, it can cause a mismatch in your IP address. This will prevent you from connecting to the internet even if there is a WiFi connection. To flush your DNS, do the following.
- In your computer’s search bar, type in “command prompt” and right-click it.
- Run the Command Prompt app as an administrator.
- Now type in the following commands and hit Enter after each one:
- ipconfig /flushdns
- ipconfig /release
- ipconfig /renew
- Once this is done, close the Command Prompt window and see if you have an internet connection.
7. Update your network adapter driver
If you regularly update your computer but don’t update your hardware drivers, you may end up with a communication error between the two due to an out-of-date network adapter driver.
Note: In this solution, we will instruct Windows to update your WiFi network adapter, but it will need an active internet connection to look for the latest version and download it. Connect your computer to your router or modem using an Ethernet cable and ensure you have internet access before moving forward.
To update your WiFi driver, do the following.
- In your computer’s search bar, type in “device manager” and open the result.
- Find “Network adapters” in the list and expand the section.
- Find your WiFi adapter in the expanded list and right-click it.
- Choose the Update driver option.
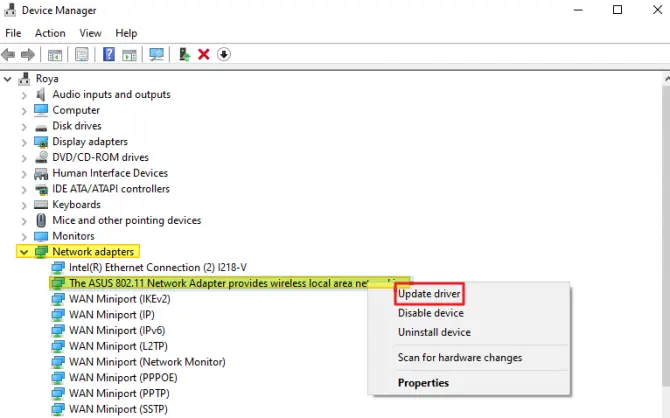
You can tell which adapter is for your wireless because it will either say that it is for a wireless connection outright or have a wireless mode listed such as 802.11.
If your computer does not automatically update the driver to the newest version, you may need to install it manually. Again, you will need internet access to do this, so either establish an Ethernet connection or move to another device with working internet access. Then, visit the motherboard manufacturer’s or WiFi card manufacturer’s website, download the latest driver version, and manually install it on the computer with the WiFi connected but no internet issue.
8. Check your IP address validity
Your computer may have an incorrect IP address which blocks it from internet access. A common reason why you might have an invalid IP is because of a static address set in Windows settings.
Unless you need to set your IP to a particular value for a specific reason, the best practice is to instruct Windows to automatically obtain an IP address and a DNS server address from your router or mode.
- In the bottom right-hand corner of your screen, right-click on the network icon in your taskbar and select the “Open Network & Internet Settings” option.
- Click on “Change Adapter Options,” then double-click your network.
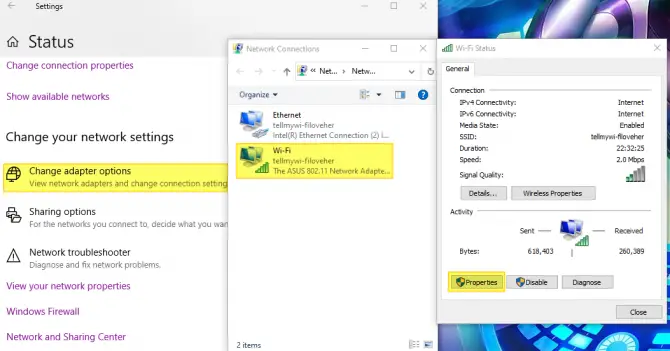
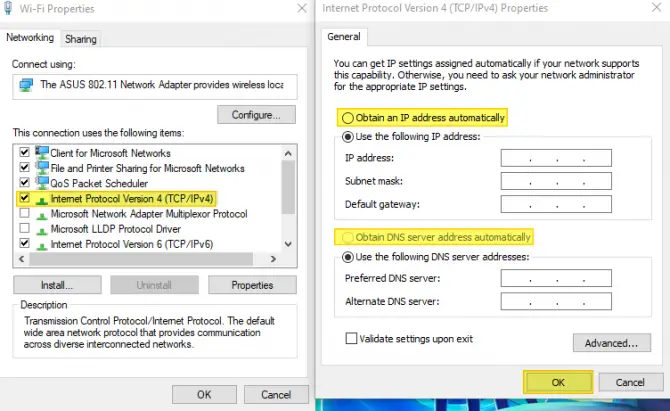
- In the window that opens, select “Properties” at the bottom, then locate and double click the entry labeled “Internet Protocol Version 4”.
- Ensure that both the IP address and DNS server address are set to be obtained automatically, then hit OK and try your internet connection again.
9. Change your DNS server address
While the default DNS server settings work fine most of the time, it is possible that the configured DNS server may be currently down. When an outage like this happens, your WiFi adapter can still connect to your router or modem, but without a working DNS server, you will have no internet access. That’s why you see a WiFi connected but no internet error message.
You can change the DNS server address in Windows to a trusted public DNS provider like Google or Cloudflare to rule out this root cause.
- Start by holding down the Windows Key, then pressing the R key to open the ‘Run’ menu.
- In the text bar, type “control /name Microsoft.NetworkAndSharingCenter” then hit OK.
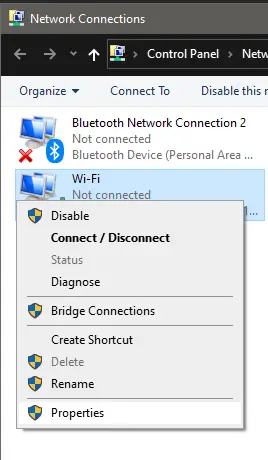
- In the top left corner of the window that opens, click “Change Adapter Settings.”
- In the center, right-click on “WiFi” then select “Properties.”
- In the new window, locate and select “Internet Protocol Version 4 (TCP/IPv4),” then click the “Properties” button below.
- This will open one more window displaying how your IP address and DNS server is obtained. Set it to “Use the Following DNS Server Address” at the bottom.
- Using Google’s DNS server addresses as an example, for the Preferred DNS server, enter “8.8.8.8”, and for the Alternate DNS server, enter “8.8.4.4”, then hit OK.
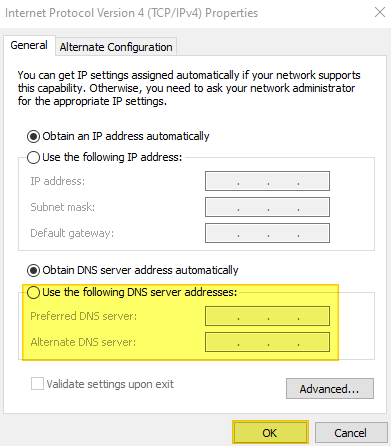
Test your internet again to see if this resolves the issue.
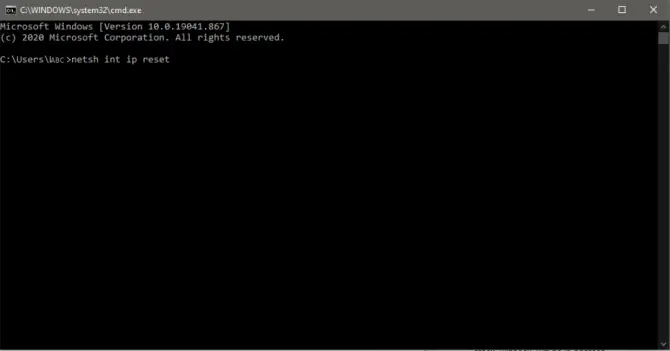
10. Reset your TCP/IP configuration using the Command Prompt
The problem with the “WiFi Connected No Internet” issue is that it can stem from several different sources. Another essential fix that you can apply is resetting the TCP/IP configuration of your computer using the Command Prompt:
- Press the Windows key + R on your keyboard.
- Once the Run window opens, type “cmd” to open the Command Prompt.
- Type the following commands and hit Enter after each line:
- netsh int ip reset
- netsh winsock reset
- ipconfig /release
- ipconfig /renew
- Check if the no internet issue is resolved.
11. Turn off IPv6
Turning off or disabling IPv6 on your system can be a quick fix when you experience no internet access issues. This action would essentially force your computer to connect through IPv4 instead.
Here’s how to disable IPv6 on Windows:
- Press the Windows key on your keyboard.
- Click on Settings.

- Choose Network & Internet.
- Scroll down and click Change adapter options.
- Right-click on your active network adapter and select Properties.
- In the Properties window, scroll down until you see Internet Protocol Version 6 (TCP/IPv6) and uncheck the box beside it.
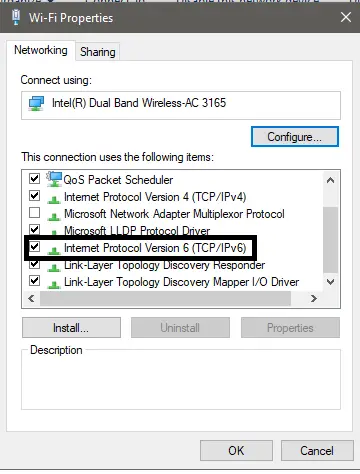
- Click OK to save the changes.
- To see if the fix worked, you may have to restart your computer.
12. Turn off 5 GHz bandwidth or change the wireless channel
Not to be confused with 5G, 5 GHz refers to your WiFi router’s frequency. Basically, the frequency of your router determines its overall speed relative to its reach. In comparison to 2.4 GHz, a 5 GHz frequency allows faster speeds at a shorter range. If you think your 5 GHz bandwidth is affecting your internet connection, you can opt to turn off 5 GHz so your device automatically switches to 2.4 GHz.
- Press the Windows key on your keyboard.
- Click on Settings.
- Choose Network & Internet.
- Scroll down and click Change adapter options.
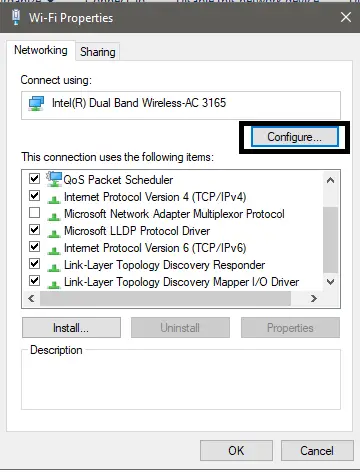
- Right-click on your active network adapter and select Properties.
- On the upper right side of the Properties window, click Configure.
- Open the Advanced tab and select the Property called Wireless mode.
- Click the Value drop-down on the right and set the mode to 802.11b/g.
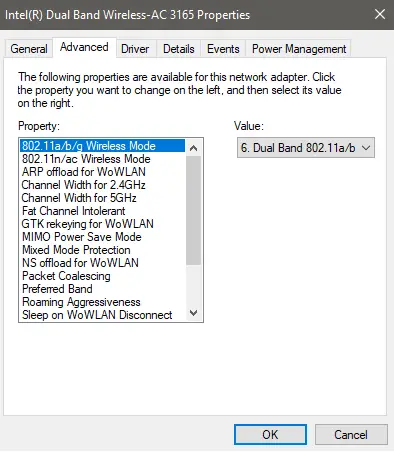
- Click OK to save the changes.
- Disconnect and then reconnect to your WiFi.
- Test to see if the no internet issue is resolved.
Note: This configuration instructs your WiFi card to only scan the 2.4 GHz b/g band, and it will not attempt to connect to your router via the 5 GHz 802.11a band. If your WiFi still has no internet access after making this change, you can also test with the other wireless modes available in the drop-down.
13. Run a malware scan
Malicious applications on your computer can cause all sorts of problems, including no internet access. In such a situation, regaining complete control over your computer and data is just as important as restoring internet access.
Whenever your computer behaves unexpectedly, it’s a good practice to run a full malware scan. Modern Windows operating systems come with a powerful built-in antivirus tool called Windows Defender.
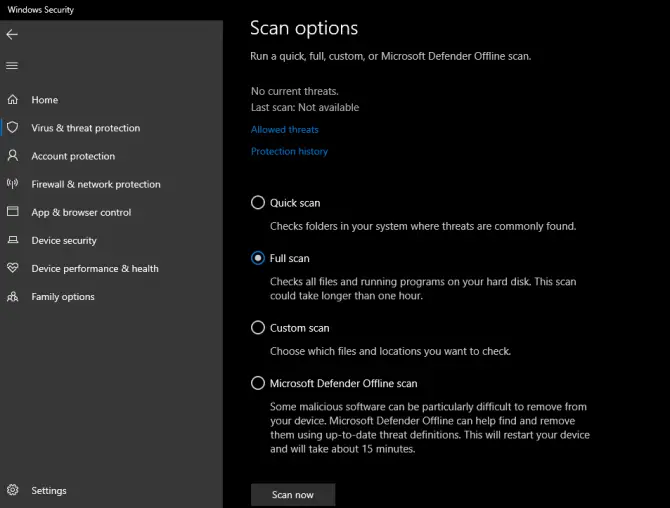
Here is how to run a full malware scan with Windows Defender:
- First, type “Windows Security” in your Windows search bar and open the app.
- In the main area of the new window that opens, click on Virus & threat protection.
- On the new screen, select Scan options.
- Pick the Full scan option, then click the Scan now button.
If you have a third-party antimalware tool installed on your system, use that as well to run another full scan.
Inspect the scan results, and if any malware was found and removed from your system, try accessing the internet again.
14. Temporarily disable your firewall and antivirus
Not just malware, legitimate computer applications can also block internet access, even if your computer says that there is a WiFi connection. In most cases, a firewall or antivirus software is the culprit. If you have third-party security software on your computer, try disabling it to see if the problem resolves itself.
Here is how to temporarily disable Windows Defender Firewall:
- Press the Windows key on your keyboard.
- Type “Control Panel” into the Windows search box and open the app.
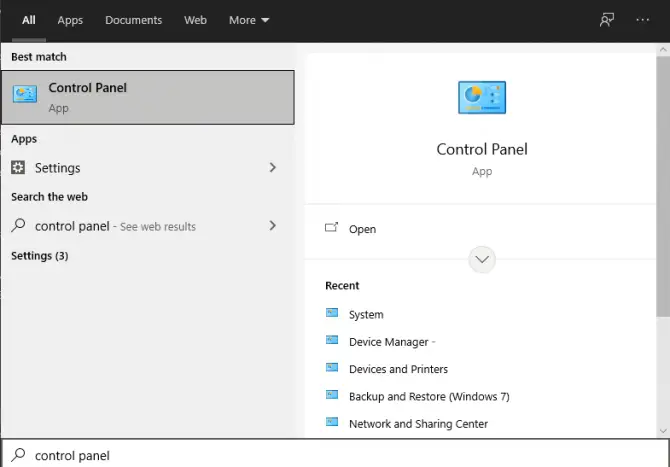
- Click System and Security.
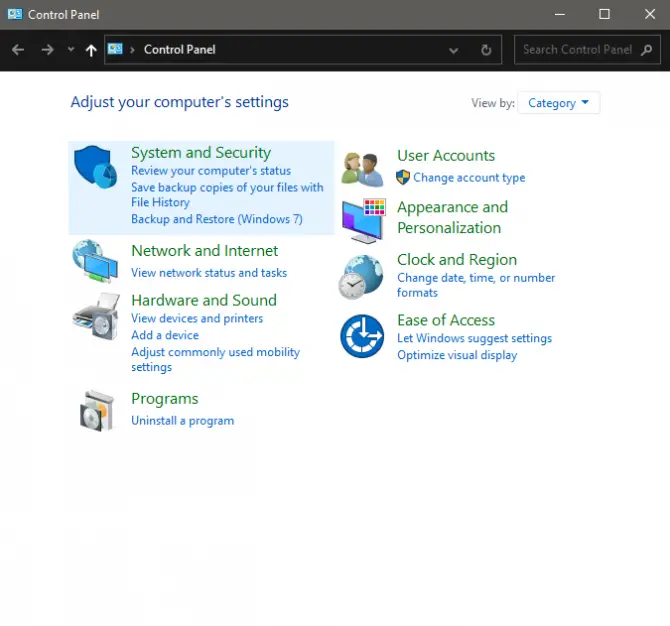
- In the new window, choose Windows Defender Firewall.
- On the left side of the window, choose “Turn Windows Defender Firewall on or off“.
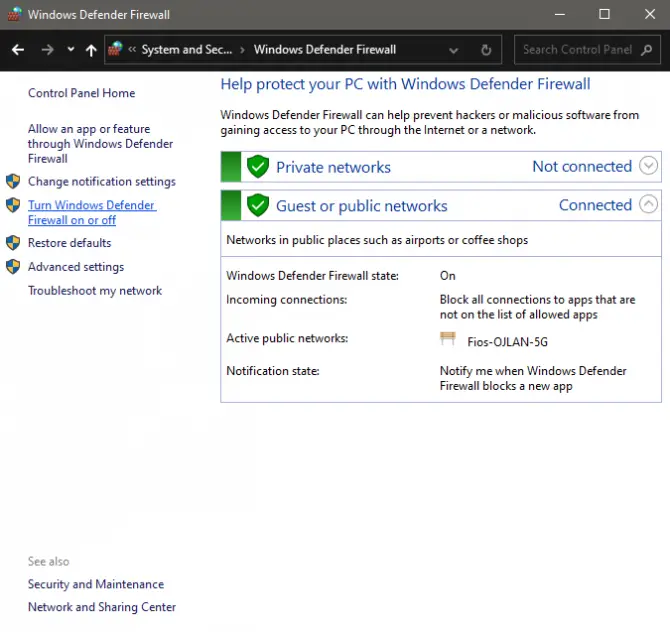
- Choose to turn off Windows Defender Firewall for the network that you are having trouble with.
Do the same with any other antivirus or firewall software that you have installed on your computer.
If you find that you now have internet access, that means that one of your security apps has a setting that prevents you from going on the internet. Carefully check the configuration of your firewalls and antivirus apps, make the necessary changes, then re-enable them. Do not disable security tools permanently.
If you have identified the application that causes your internet connection issue, but you can’t figure out why then your best option is to replace that app with a similar tool from another vendor.
Methods to solve the “WiFi Connected But No Internet” across your entire network
1. Check if your Internet Service Provider (ISP) is down
If all of your devices have a connection to your wireless network, but you cannot access the internet, it may be due to an outage with your service provider. The only way to check this is to either use cellular data to look up your internet service provider’s network through their website or social media pages or call your internet service provider.
In some cases, if you are able to use cellular data to get online, you can use other websites like DownDetector to see if the service is down or if others are reporting the same issue as you.
If your internet service provider is not experiencing an outage, your router is likely the source of the issue. Move on to the next step below.
2. Remove any WiFi range extenders
The more complex your WiFi network, the more problems you will have with it. For example, WiFi repeaters and range extenders are notorious for introducing their own set of network stability and connection issues.
When you experience a network issue like WiFi connected without internet, you should remove all additional components from your network, including switches, WiFi repeaters, range extenders, etc. You should only test with your modem and router combo.
If you find that you have internet access when connecting directly to your primary WiFi router, then you can be sure that the issue is with one of the additional devices that you have just removed. Start adding back the extra components, and when your internet access drops again, you have found the faulty device. It might just be a configuration issue, but you may have to replace that hardware piece.
If you are connecting to your primary router and still don’t have internet, you will need to focus on your router next.
3. Reboot your modem and router
Just as it sounds, turning your router and modem off, then on again is a step anyone can try, and it does resolve many internet connection issues.
- If you only have a router, power it down, then unplug it from the wall. Then, after about 3 minutes, plug it back in and turn it on again.
- If you have a router and modem, power both off and unplug them. Plug the modem in first, after about 30 seconds, then wait another few minutes before powering on the router.
Once everything has finished powering up 5-10 minutes later, test your devices again to see if the issue is resolved.
4. Check MAC address filtering in your router settings
Media Access Control (MAC) addresses are unique identifiers that you can use to control network access for devices. Most routers come with a feature that allows filtering device access based on MAC addresses.
You need to check if this feature is enabled and if it is in allow or deny mode. The selected mode determines if the MAC addresses that are listed in your router – and ONLY those that are listed – can connect to the internet (allow mode), or if the listed devices are prevented from connecting (deny mode).
You can access your router’s management console from any web browser. You just need to know the correct IP address.
You can usually find the default IP address at the bottom of your router box. If you can’t find it there, here is how to retrieve it using the Command Prompt and then disable the MAC address filtering in your router:
- Press the Windows key and type “cmd” into the search field.
- Right-click the Command Prompt app and click Run as administrator.
- In the Command Prompt window, type the command “ipconfig” and press Enter.
- Look for your Default Gateway IP Address that will look something like: 192.168.X.X
- Type this IP address into your favorite web browser to open your router’s management console.
- Most likely, you will need to log in with your router’s credentials which are NOT the same as your WiFi username and password. These may be located on the back of your router or may simply be “admin” if you’ve never changed them before.
- Once you can access your router settings, make sure that the MAC address filtering feature is disabled or that you do not deny internet access to your device with a specific filtering rule.
5. Update your router firmware
Just as outdated network drivers, an out-of-date router firmware can also cause network issues. The exact actions needed to update a router firmware varies based on the router’s brand, but the general steps are listed below.
Warning: Updating hardware firmware always has some risks. Make sure that your router’s power supply is stable, and do not interrupt the update process at any point because that can completely break your device.
To update your router firmware:
- Check your router’s model type, which is typically written on the back of the box.
- Visit the router manufacturer’s website, search for the latest firmware version for your router model, and download it.
- Log in to the router’s management console as explained in the method above.
- Search for the Firmware update menu item. The exact location will vary based on the brand.
- Select the downloaded firmware file and start the update process.
- Let the process finish without interfering with your router in any way.
6. Check your mobile data when using a hotspot
This method applies to cases when you share WiFi to your computer from a mobile hotspot. Many users report a hotspot connected but no internet issue because while the WiFi hotspot may be enabled on their Android smartphone or iPhone and other devices can connect, their cellular or mobile data is probably turned off.
Here is how to check your mobile data on Android while sharing a WiFi hotspot:
- Open your Settings app. (Cogwheel icon)
- Navigate to WiFi & internet.
- Click on SIM & network.
- Search for the Cellular data section, and ensure that the Mobile data toggle is ON.

Last resort: Reset your entire network
If you are still experiencing the WiFi connected without internet error after going through all of the methods above, you may need to reset your entire network.
A network reset will change your settings back to their default state and remove all network adapters as well. Unfortunately, you will need to set everything back up again, including updating default network adapters and reconnecting to your local network. You will need your internet network’s password in order to do this.
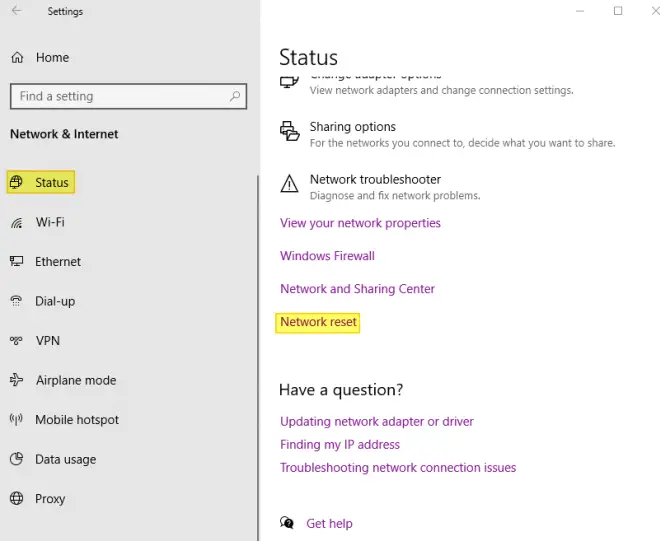
To reset your network, follow these steps.
- Type in “settings” into your computer’s search bar.
- Click on the “network & internet” option.
- In the left-hand menu, click on the “status” option.
- Scroll down until you see the “network troubleshooter” section.
- Find “network reset” in the options.
- Click on “network reset” and follow the on-screen instructions.
Once the network has been reset, reconnect to the internet by clicking on your internet’s taskbar icon. You may need to bring up a list of available networks, find yours, and connect to it.
Conclusion
Hopefully, one of the methods listed above has successfully solved your WiFi connected but no internet issue. However, if you still have no internet access on your computer, your best bet is to contact a professional IT technician to further troubleshoot the problem.
Alternatively, you can check out our related article on a similar network connectivity issue that comes with the error message No internet, secured. Follow the methods in that guide if you think you might be experiencing that error instead.
Let us know in the comments which solution method worked for you or if you have found another way to fix this pesky internet connectivity issue.
1st option worked. Mucho Thanko
Thank you! Don’t even remember turning fast startup on but that seems to have been the issue! You saved my frustration levels drastically.
Worked for me too after trying everything else first.
thank you so much
Thanks a lot. Step 2 worked for me. I had tried several other troubleshooting websites beforehand, but to no avail …
I would like a pdf copy of your article so I can read and fix the problem for a senior who is housebound at the moment.
Thank you.
When you are on the article page, you can simply right-click anywhere in the window, select “Print”, and then choose “Save as PDF” to download a copy of the article in a PDF. I hope this helps.
If I buy a internet repeater, will I be able to use that as the router?
#5 Worked like a gem! Took a long time to find this VERY useful information. I’m so grateful I did eventually come across this article! THANK YOU!!!!
My issue is with a school, it has a fiber connection and then 13 access points (UNIFI Ceiling mount) and a gateway (TP-Link), and a couple of lan cable and one Gigabit switch (TP-link). Some teachers will be online but other will get a no internet connection. what might be the solution for that?
it was succesful , thanks . Dns address made the difference
After several hours trying to fix my issue, I found it here, extremely useful, thank you guys
Step 5 worked for me, thank you so much!
Excellent write up, thanks for the tips.
Tried all options. Did not work. Now says – no Wi-Fi networks found. This desktop is older and worked on ethernet connection. Moved it to another location where ethernet is not. Wi- Fi works well on other devices, tablets, phones. Trouble- shooting says that network adapter is working well.
Puzzling!
I actually was using the same WiFi network on my phone and my laptop, after a while both on my phone and laptop it says connected but no Internet, however on my sibling’s phone all are working. what could be the possible reason for that?
It works!! thank you
My issue was:
Some providers must list your router MAC address in order for you to receive internet.
Once they whitelisted the mac address of the router all was fine
you’re a lifesaver. number 5 worked for me. thank you so much!!!
RESET YOUR ENTIRE network seems drastic and sounds like I may be digging a deeper hole. Does that mean all my ROKU, VOIP phones, Alexa,… network settings will have to be reinstalled? The problem (rarely) occurs but it’s on my desktop PC which is Ethernet connected. Is there a report I can produce showing all my network settings prior to resetting them?
Thanks,
Dan
What should I be looking for if it self corrects.( Next time I check wifi is connected to internet)
I am using wifi then get the message connected but no internet, or wifi disconnected.
Jessica
Option 2 worked. Thanks a lot.
Option 6 DNS server address was wrong . My connection was showing connected but no pages were loaded on browsers. Finally this worked. More than 2 years spent connecting lan cable. Thanks a ton.
Number 5 for the win!
Thank you for your detailed listing. Turning off fast startup cleared up my problem. I have experience with software and hardware support, and never would have thought to try that.
My issue wasn’t on here it was fixed by setting date and time to the correct ones
Thank you so much. 5 Option worked for me.
Thank you thank you thank you.! I’ve been struggling for 2 weeks with internet connection. Thanks for taking the time to be so clear and thorough and in a few simple.steps a miracle happened and I can work again. You are a blessing.
I don’t know where would i be without your help. Flush DNS worked like a charm for me. Thank you so much.
You deserve many accolades!!!
Step 2 worked for me. I have bookmarked your page. Nice job 👏
Thank you, that worked very well for me.
Tnx so much it has worked
If you have any social media channels pls send me alink to follow you!
If I turn off my mcAfee personal firewall and the Windows Defender, aren’t I exposing my computer to hackers, etc?
That’s correct, you do expose yourself. That is why it’s recommended to only disable your firewall and antivirus temporarily to see if that fixes the issue. If you find that the root cause is your firewall or antivirus, try changing its settings or replace it with an alternative from another vendor. Hope this helps.
Thanks. Option #2 fixed my laptop.
I did all 10 and nothing has worked so far, anything else I can do?
This has solved my problem “1. Use Windows Network Troubleshooter.”
Thank you!
Thank you so much! This helped me resolve my laptop’s connectivity issues!
Bro, so so so thank you very much, it was working. Solved in option 2
Thanks, the DNS flush worked. This is an amazing guide as I can never remember all the steps.
Fix #6 seems to be missing something. Isn’t the text missing a “.exe”?
Are you referring to the text in step 2: “control /name Microsoft.NetworkAndSharingCenter”? This is the correct way to open the Network & Sharing Center. It won’t work with an added “.exe”.
Very good and thorough guide to step through all of the possible issues for this. Great with the screenshots too. Thanks for the helpful guide.
OMG! I have my laptop back. You are brilliant. Thank you so much.
Sorry, I can’t fix my issue because it isn’t a Laptop it’s a cellular phone and it hasn’t a console, nor a Window OS. I’ve Android.
AWESOME THANK YOU SO MUCH
Last option did the trick! Muchos Abrigados
Thanks a lot.Step 3 worked for me😊
I tell you what, I am thanking God for you right now. My problem was the quick startup option on my laptop. Thank you for posting this. You rock!
BT enineer wasn’t able to direct after Digital Voice changeover. Ran through most of the above & it now works. Appreciated rw
Installing VPN shut off my internet. When I closed VPN my internet returned … immediately!
A lot of great stuff here, unfortunately none worked. My internet is connected and wifi too, which I know because the PC I’m typing this on is fine. This is a fairly new computer too. This just happened overnight so I wonder if the DST change affected it somehow?
option no 6 worked for me. thank you
Number 3 worked for me. Thank you sooo much !!
Thanks a million! I tried many methods myself. Your method no.08 worked for me.
I did step 1 – 4 then restarted my computer and boom it worked…. Thanks a thousand times, so sad I don’t know which step fixed it 😄
Wish you all the best in the world
Number 5 worked !!!
Thank you
This helped! I disconnected my VPN and it worked.
I suddenly could not access chrome or gmail, but only on my laptop. Other devices worked well .
Solution 6 did the trick.
Thank you so much for your clear informations.
I saved your site for any glitches in the future.
It was the time and date settings. Thanks!
10. Reset your TCP/IP configuration using the Command Prompt
This worked for me thank you
After nearly a week of no wi-fi, and no solutions, I stumbled upon your website. I first tried options 11, 13 and 14 in random “order”, without success. Option 12 was the solution to my problem. Looks like the 2012 HP laptop has a new lease on life. Thanks so much to you and your wonderful website!
A well constructed set of procedures which were easy to follow and solved the problem at step 4. Thanks very much !
First option worked. Thanks you
Fast start up was the issue, thanks so much!
It worked for me! I tried a lot of options and they didn’t work immediately. However, as soon I restarted my laptop it worked. So I don’t know which option worked for me, but I am very thankful!!! Thanks guys!!
My problem was that the laptop was showing “connected to the network, but no internet” and now it’s resolved, thanks again!!
Brilliant tutorial.. TOmorrow I am going to try one by one..
I was able to fix it somewhere around steps 11 and 12. I’m technically clueless, so I’m so glad you saved me after a stressful morning and a Eureka moment when it finally wored
Very much appreciated. You solved my problem and saved me from potential embarrassment. Thank you very much