Perhaps you’ve followed our CPU fan error troubleshooting guide and determined that your CPU fan needs to be replaced. However, if you are still nervous and uncertain about how to replace a CPU fan, don’t worry, we got you.
Follow this foolproof guide to learn how to replace your CPU fan safely and without damaging your motherboard or other components. We’ll also cover everything you need to know about thermal paste removal and application.
Note: When working on internal computer components, always wear an anti-static wrist strap or keep one of your hands on the computer’s metal case while working. This prevents static from damaging sensitive components.
Decide Which Fan to Use
Before you can start replacing your CPU fan, you need to buy a replacement unit. The two major processor brands are AMD and Intel. Essentially every CPU is manufactured by Intel, with 72.3% of the market, or AMD, with 27.7% of the CPU market. But how do you know which fan you need to buy?
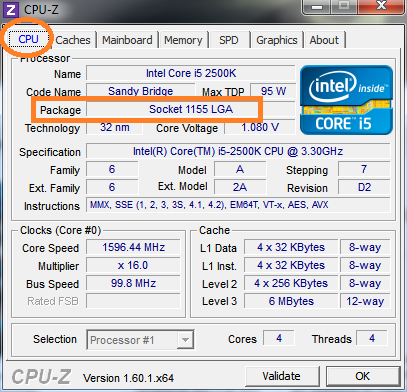
Install CPU-z, a free software tool that easily compiles tons of useful information about your CPU, RAM, motherboard, and other hardware. You can find out what processor your computer has and which socket type it uses. For example, in the image below, you can see that the processor is an Intel Core i5 2500k and the socket listed in the ‘Package’ field is Socket 1155 LGA. Now just research Socket 1155 LGA Intel CPU coolers.
Alternatively, head to the manufacturer’s website, whether Intel or AMD and search the CPU model. You’ll be able to locate a specifications sheet that has the socket information. Use this data to find an ideal replacement fan that is compatible with your CPU.
Once you have your new CPU fan ready, you can start the replacement process.
How to Remove Your Current CPU Fan
- Power off your computer and unplug it from any power source. Clear an area on a table or the floor and place the computer on its side. This provides a better working angle and prevents you from possibly bumping and damaging the graphics card.
- Remove the side panel. Make sure your hands are clean and use an anti-static wrist strap so you are grounded and will not damage any functioning components.

- Look inside and locate the CPU fan. Most likely, it’s going to be parallel with the CPU because that’s the most common setup. The CPU is directly under the fan:

- Unplug the CPU fan connector cable from the 4-pin CPU_FAN header. Check the images below to see a before and after of what it should look like when you disconnect the fan:

- Remove the screws or unseat any connector to allow the CPU fan to come loose. Refer to the motherboard manufacturer’s manual if you need help disconnecting the CPU without damaging components. My CPU cooler has clip posts, but yours may have actual screws:

Here’s an example of a CPU cooler that is screwed in:

How to Install Your New CPU Fan
Once the CPU fan has been removed, you can switch gears and start installing a replacement fan. You’ll probably notice that the CPU is covered in silver-colored residue. This is the dried thermal paste, which you need to remove before installing the new fan. This is because you have to apply a fresh dab of thermal paste on a cleaned surface to mount the fan.
Before removing the dried thermal paste, you may opt to remove the processor from the motherboard. This eliminates the chance of getting thermal paste or alcohol droplets on sensitive circuits. If you are uncomfortable removing the CPU, continue past this step and onto thermal paste removal.
1. Remove the Processor
1. Find the lever on the side of the processor. It’s a metal bar, as shown in the image below. Push the end of the level down slightly, pull it away from the processor, and lift the lever up straight. If there is a retention bracket, you can lift it out of the way
The lever on this computer is tucked under a clip. Simply pull it out and away from the processor until the lever can be lifted up.

Here’s another example:
2. Now, you can easily lift your CPU out of the socket. Be careful to only grab the edges. If you flip it over, you’ll see all the pins. Take care not to bend any of the pins, as this will render the CPU useless.

2. Remove the Old Thermal Paste
To effectively and safely clean the dried thermal paste from your CPU, you’ll need to buy a bottle of alcohol with 90% isopropyl or above. Anything lower than 90% has too much water, which you should avoid using on computer components.
- Place the processor on a paper towel, with the pin side down. Using a q-tip dipped in isopropyl alcohol, carefully clean all the thermal paste from the top of the CPU. If you didn’t remove your CPU from the motherboard, take extra care not to brush dried thermal compound onto the motherboard or drip alcohol on your motherboard.

3. Reinstall the Processor
If you removed the processor, reinstall it once you got the old thermal paste residue cleaned up. Then you can continue with replacing the CPU fan. Note that the CPU in the example pictures was not cleaned, but yours should be at this stage.
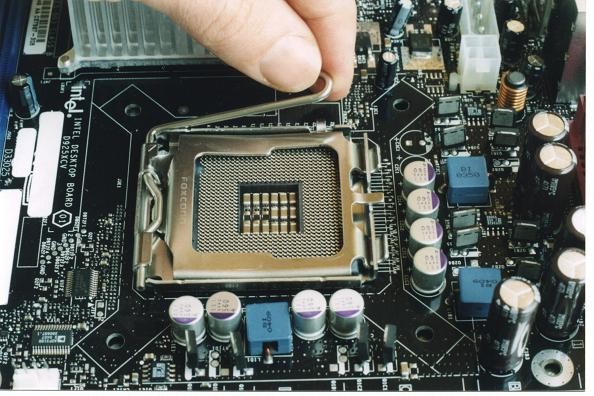
- When reinstalling the processor, check for the gold directional arrow on the corner of the processor, then find the arrow on the corner of the socket. You need to line up those two when seating the CPU. Also, note the cutouts (circled in orange). These cutouts help ensure that the CPU can only be installed in one configuration, so pay close attention and make sure everything lines up.

- Gently place the CPU down into the socket. There is no force needed. If you try to force the CPU in, you may damage some pins. The processor should just drop right in.

- Close the retention bracket and close the lever back down.

4. Apply New Thermal Paste
Before you can install the new CPU cooler, you need to apply thermal paste. Thermal paste ensures there are no air gaps between the metal of the fan and the processor so that there is maximum heat transfer. This step is not optional, if you fail to add thermal paste, your processor will quickly start overheating again.
There are many differing opinions on the right and wrong way to apply thermal compounds within the IT community, but there’s no need to worry about the fuss. The most important part of adding new thermal paste is to add the right amount:
- Apply a pea-sized amount of thermal paste in the very center of either the attachment surface of the fan or the CPU. DO NOT apply to both, or you will have way too much thermal paste.

Do not spread the thermal paste out, there is no need. It will be evenly distributed once the fan is installed.
5. Install the New CPU Fan
Finally, it’s time to install your new CPU fan. You should’ve removed the old thermal paste and applied a new dab to the attachment surface of the fan or to the CPU at this point. Now follow these steps to finish securing your new CPU cooler:
- Gently place the CPU fan onto the processor itself. Carefully align the CPU fan with the CPU retention post holes.
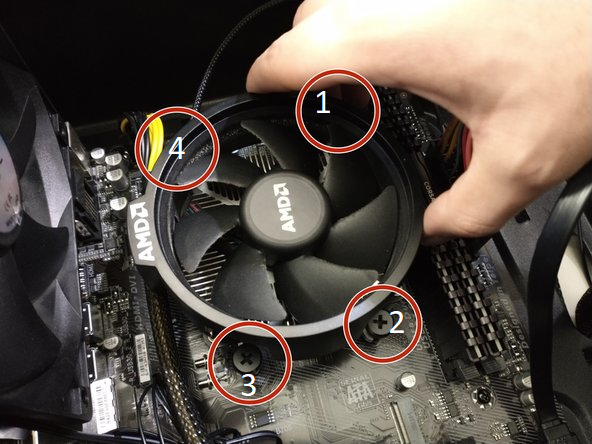
- Using a star pattern, install the screws. They may be spring-loaded and need a little pressure to get started. Think of the four holes as 1 in the top right, 2 in the bottom right, 3 in the bottom left, and 4 in the top left. Start with 1, then move onto 3, then 2, and finally 4. insert the screws in halfway first, and once they are all soft-mounted, you can go back around and repeat the same pattern one more time in tightening them up to ensure they are all secure.
Don’t over-tighten. Overtightening these screws could crack or damage your motherboard, which would be very bad.
- Reattach the CPU fan cables to the CPU fan 4-pin connector on the motherboard. Check that the CPU fan cable is out of the way and will not impede the spinning of the fan. Usually, there will be one connector for CPU_FAN, but there may be a second cable that needs to be connected to CPU_OPT. It will look something like this:

- Now it’s time to reinstall the computer side panels and plug the power cord back in. Turn your computer on and check if the CPU fan is spinning. If so, then you have successfully replaced your CPU fan on your own! Hurray!
FAQs
You should consider replacing your CPU fan if you are experiencing CPU fan errors, major slowdowns, fan operational malfunction, or a considerable increase in temperature in your CPU. Also, if cleaning your CPU fan hasn’t worked and it still won’t spin even after all the dirt and grimes are removed. These signs mean your CPU fan is failing to adequately transfer heat away from the CPU, causing it to overheat.
The hardest part about replacing a CPU fan for most people is the anxiety and fear. As long as you follow the key rules to protect your computer against static or damage, replacing a CPU fan is very safe. But many people feel uncomfortable touching computer hardware. Just remember not to force anything or press too hard; you’ll be fine if you follow the steps in this guide!
Yes, you can replace the CPU cooler without removing the motherboard. Although you may opt to remove the processor from the motherboard to be extra safe when removing thermal paste.
No, you cannot leave the old thermal paste on when replacing a CPU cooler. The old thermal paste is not properly sealed against the new CPU fan, meaning there will be too many air gaps, and the heat dissipation will be severely impeded. If you do not remove the old thermal paste, your processor will likely overheat.
No, you should not use a paper towel to remove the thermal paste from your CPU. You can use a microfiber cloth or a q-tip that has been dipped in 90% isopropyl alcohol. Continue cleaning the thermal paste off until the q-tip or cloth come away clean.
Isopropyl alcohol with over 90% alcohol content is the only alcohol you should use in removing thermal paste. Anything lower than 90% contains too much water.
You must be careful when applying thermal paste. use only a pea-sized amount or the volume of 2-3 grains of rice. Too much thermal paste will also cause your CPU to overheat.
The majority of thermal paste brands will last for 2-3 years, but higher-end brands may last 7 years. In general, you should consider removing your CPU fan, cleaning the old thermal paste off, and reapplying fresh thermal paste every 2-3 years. This keeps your CPU running nice and cool, so your PC’s performance isn’t affected.
The thermal paste helps in preventing overheating. But if the cause of CPU overheating was your fan shutting off or not spinning fast enough, then thermal paste alone will not fix the problem. The CPU fan and thermal paste combine to create effective heat dissipation for the processor, so both are necessary to function correctly.
New CPU Fan and Thermal Paste Successfully Installed
If you’ve followed along with this guide, you must have a brand new CPU fan installed with a fresh application of thermal paste by now. Your computer will run much smoother because your CPU won’t constantly overheat, and you won’t have any more dreadful bluescreens or CPU errors.
It can be daunting at first if you’ve never replaced a computer component. Replacing a CPU fan may require more involvement than removing and replacing a stick of RAM, but as long as you don’t force the CPU into the socket and are cautious when working on your computer, you won’t have any issues. Listen to the recommendations and follow each step closely and you’ll learn a new troubleshooting skill.