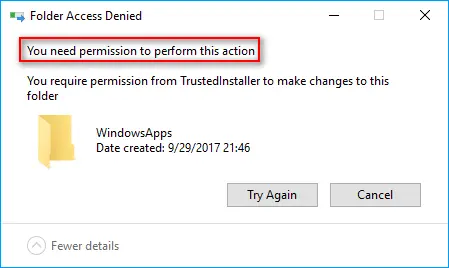
As the primary user of your computer, you may be surprised to find that you do not have full control over every file on your system. Despite acting as an “administrator” in your system, there are important system files that you cannot rename, delete, access, or modify without permission from a Windows component called TrustedInstaller. When you come across these files and you try to make changes to them, you will receive an error message that states, “you require permission from trustedinstaller” to make these changes or to delete this file. Fortunately, this error message is relatively easy to get around and can be resolved with a few types of fixes.
What Is the TrustedInstaller & Why Does It Pop Up?
The TrustedInstaller or NT Service is a built-in core account that handles important processes for the Windows Modules Installer. It is a key component for all Windows 10/8/7/Vista computers, as it protects critical system files from sustaining accidental damage or from being tampered with. It is given ownership over many important files that exist on your system, which is why you cannot access these files even with Windows administrator privileges. This service is responsible for the following:
- Protecting core Windows files.
- Removing optional Windows files.
- Installing, modifying, or deleting Windows Updates for the Windows Modules Installer Service.
The error message, “you require permission from trustedinstaller” will pop up when you try to delete, modify, rename, or access core system files that are protected under the ownership of the TrustedInstaller process. If you are looking to make changes to these core system files and are confident in your ability to tweak them, delete them, access them, or modify them without causing damage to your computer system, then read on to find out how to get around the “you require permission from trustedinstaller” error message.
2 Ways to Fix the TrustedInstaller Error Message & Take Ownership
1. Use File Explorer & Change Permissions to Gain Ownership.
The easiest way to gain ownership over a file or folder that you want to modify, access, or delete is through your file explorer and with advanced special permissions. To use this method, log in as an administrator and then complete the following steps.

- Open up your file explorer and find the file or folder that you want to modify, delete, or gain ownership over.
- Right-click on the file or folder and choose properties from the menu that pops up.
- In the properties window, click on the security tab at the top. Under the “permissions for system” box, you will see an advanced button with text to the left of it that reads: for special permissions or advanced settings, click advanced.
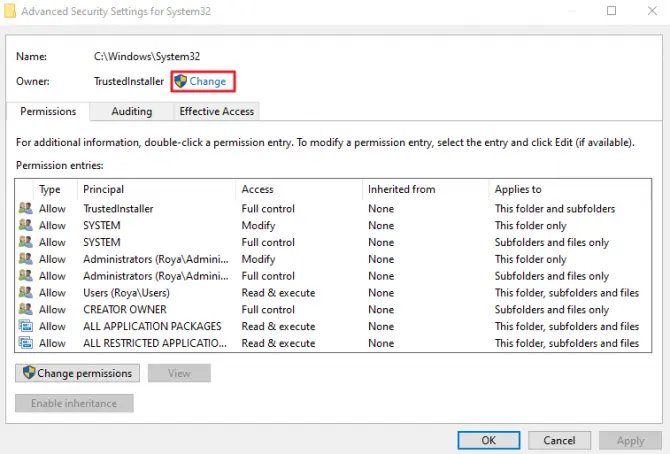
- Click on the advanced button. In the advanced security settings window that pops up, you will see that the owner of the file is TrustedInstaller. Beside the name, there will be a little hyperlink that says, “change” – click on it. For Windows 7 users, navigate to the “owner” tab and click on edit.
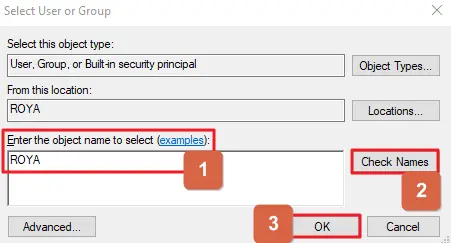
- In the new window that pops up, you will need to type in the user name you are using on your system and then click on the check names button. Windows will automatically check the name and complete the full object name for you. Once this is done, you will be able to click on the ok button.
For Windows 7 users, click on “other users or groups” and proceed with step 5.
Please note: if your account name does not pop up, you can look for it manually in the list of users.
- Back in the advanced security settings window, a new line will appear under the owner line which you just changed. It will read “replace owner on subcontainers and objects” – check this box to ensure that all sub-folders or files associated with this file or folder will also have their ownership changed to you. This is good to do as it means you won’t have to repeat steps 1-5 for all sub-directories present.
- Hit the apply button. Close the properties window and re-open it.
- Select the security tab at the top again and click the advanced button again.
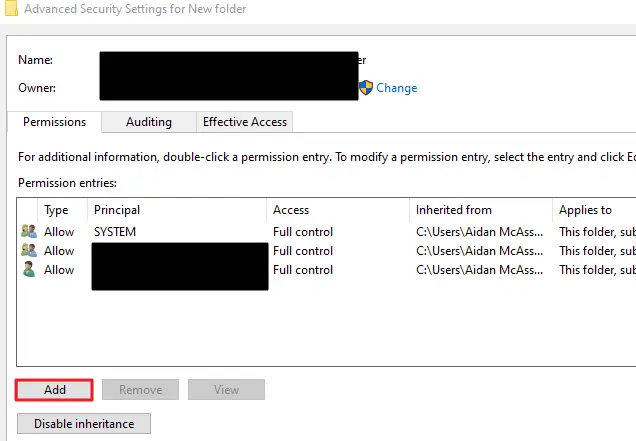
- In the permissions window, select the add button.
- Choose the “select a principal” and input your username and check all of the permission boxes or if available, choose full control. Hit okay.
- Now check the box that says, “replace all child object permission entries with inheritable permission entries from this object” and hit the apply button.
Now the ownership will be changed from TrustedInstaller to you. You will no longer need permission from the TrustedInstaller to perform the action you wanted on said file or folder and all sub-directories within.
Note: If you are using Windows 7, the same steps apply but you may need to navigate to the owner tab and click on the edit button in the advanced security settings window and then use the “other users or groups” to enter in your username for the check name process. We’ve included these as extra in the steps above.
2. Use the Command Prompt to Take Over Ownership.
If you want a quicker way of changing ownership over and are comfortable using your computer’s command prompt function, then use the following steps to take over ownership. Please note, you must be using Windows as an administrator for this to work.
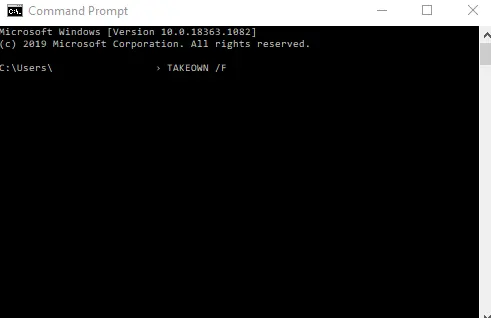
- Open up the command prompt program by searching for it in the Windows search bar or by using the Windows start menu.
- In command prompt, type in the following command to take control of a particular file or folder: TAKEOWN /F [filename]. For this to work properly, you will need to enter the full file name and the path without including the parentheses or full stop.
- If the command is successful, you will receive a message that states “Success: the file/folder [filename] is now owned by [username]. With the filename being the file or folder that you wanted to access and the username being yourself.
You now have ownership over that particular file and can modify it, access it, or delete it as you wish.
FAQ: Learn More About the TrustedInstaller Component
When dealing with extremely sensitive components of your computer system, it is important to have access to information that explains how a particular component functions and works. Here are a few common questions that come up and their respective answers.
Yes, it is. It is included in the Windows Resource Protection portion of your operating system and is found in all OS versions from Vista onwards. It works closely with other installer services to protect core system files from unauthorized access. Due to its high CPU usage, many mistake it as a virus. It can be hijacked by malware though, so it is important to regularly run your computer files through anti-virus software.
Yes, it can. You will need to open up your task manager. You can do this by either pressing CTRL + SHIFT + ESC at the same time or by right-clicking on your desktop toolbar and choosing the task manager from the list. When in your task manager, click on the default tab (processes) and find the trustedinstaller.exe process and hit the end process button
Yes, it can. However, it is not recommended to remove it as it will no longer be able to protect critical system files and your Windows update service will be impacted negatively. If you truly want to stop the TrustedInstaller from functioning on your computer, type in services.msc into your computer’s search bar to get a service window to pop up. Find the TrustedInstaller in the list and click on the stop button.
It is advisable that you only change the ownership from TrustedInstaller to yourself on files that you know about as making changes to protected files or even deleting protected files can have a serious impact on your system. Once you have made the necessary changes, it is also recommended that you change the ownership back to the TrustedInstaller to prevent accidental damage or unauthorized access in the future.
No matter what I do, I cannot stop trustedinstaller from preventing me to delete MS Edge. I’ve tried every tutorial I can find and nothing works.
You may not be able to delete Edge but you can disable it quite well and ignore it in the future. We all hate Microsoft’s monopolistic tendencies. They need another very heavy fine. They didn’t learn from before. It’s not as if their programs even work well. You can always find something way better if you look. Often you can delete some pieces of a program so it can’t protect itself as well, then you can delete the rest bit by bit. I’ve done that many times with stubborn programs that will not be allowed to be removed. You’re working around the problem but sooner or later every scrap of that program is gone. Use a good search program like Ultrasearch to make sure everything is gone as well but realize there may be scraps left in other areas that are named something a little different. But it doesn’t matter if you’re removed most of it because it won’t function. You’ve but off its legs. Where can it go?
I have tried your suggestions several times and found them useless. Something is overriding what I’m doing. I so wish it worked.
I tried it again and it worked. Thank you. Microsoft doesn’t make it easy. I guess they are trying to protect us from ourselves. To others I’d recommend just doing the process over and over again and you may realize you missed something. Look at everything you can do at each stage. Like any software. Another solution is to load an erasing program on a USB drive/card and boot from that so Windows has little control over what you are about to do.