Out of all the computer errors that pop up on Windows 10, one of the most inconvenient ones that users encounter is the kernel power 41 error. With this error, your computer may shut down unexpectedly, randomly reboot, or even crash every time you try to wake it from sleep mode. While this may just seem like a minor annoyance, it is definitely an error you want to pay attention to since it indicates that your Windows system has critical system issues or instability.
What Is Kernel Power 41 Error & Why Is It Critical?
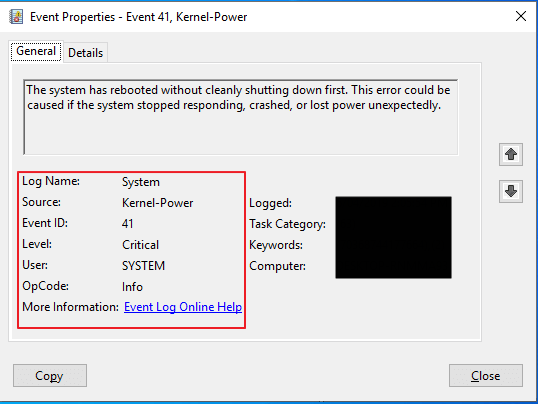
The kernel power 41 error is generated by Windows 10 when the system reboots without cleanly shutting down first. It means that your system wasn’t able to go through the routine shutdown procedure, and instead had something else cause a crash, loss of power, or restart. This is a critical error because it means that there is an instability in your system preventing your computer from working as it should.
What Causes the Kernel Power 41 Error?
While this error can be triggered under a range of circumstances, the most common cause is an underpowered or failing power supply unit. Other scenarios that may cause this error to pop up are outdated drivers, a hardware problem with random access memory (RAM), or a system that is overheating.
9 Methods to Fix the Kernel Power 41 Error
Before we jump into the solutions for the kernel power 41 error, there is an easy way to check to make sure that this is indeed the error you are encountering. Simply search, “event viewer” in your computer’s search menu and click on the “event viewer app” that pops up. In here, you will be able to see a log of all the warnings, errors, and system messages that your computer has encountered. If you do find the kernel power 41 error in the logs, here are 9 methods to fix it.

1. Update All Drivers.
The first thing you should do is check to make sure that you don’t have any outdated drivers operating in your system. There are a few ways you can update your drivers.
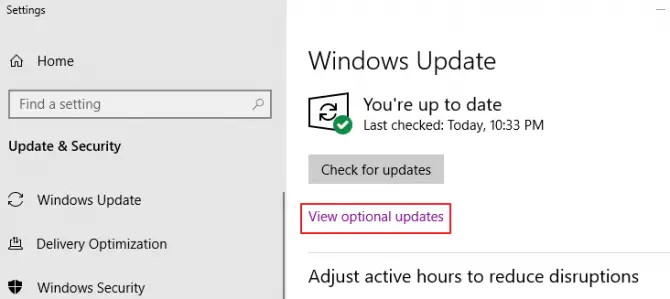
- Run a Windows Update Check. To do this, type in “Windows Update” and choose “Check for Updates” in your computer’s search menu. If there are any outdated drivers listed, update them.
- Manually update the drivers by heading to your Device Manager and right-clicking on all hardware that requires drivers to run and choosing to update them.
- Use an updater tool to automatically update your drivers. Examples of third-party update tools include: Intel Driver & Support Assistant or AMD’s Graphics and CPU Driver Software. We do not recommend downloading any software that does not come directly from Intel, AMD, or the software’s manufacturer. In instances where there isn’t support like with audio drivers, it is better to head to your motherboard’s manufacturer and download the drivers from there or use Windows built in system.
2. Remove Duplicate Audio Drivers.
The kernel power 41 error can occur if you have duplicate audio drivers installed.
- Hit Windows Key + X on your keyboard.
- Choose Device Manager from the menu popup.
- In the list, find the “sound, video, and game controllers” option.
- Hit the down arrow to expand the section list.
- Look for duplicate audio drivers.
- Right-click duplicates, hit disable.

3. Uninstall Third-Party Antivirus Software.
Some antivirus software programs can cause the kernel power 41 error to pop. If you have a third-party antivirus software, temporarily uninstall it and enable Windows Defender instead. See if the issue is resolved.
- Type “control panel” into your computer’s search menu.
- Under programs, click “uninstall a program”.
- Find your antivirus in the list and select it.
- Click uninstall at the top.
- Restart your computer when it is done.

4. Change Power Settings.
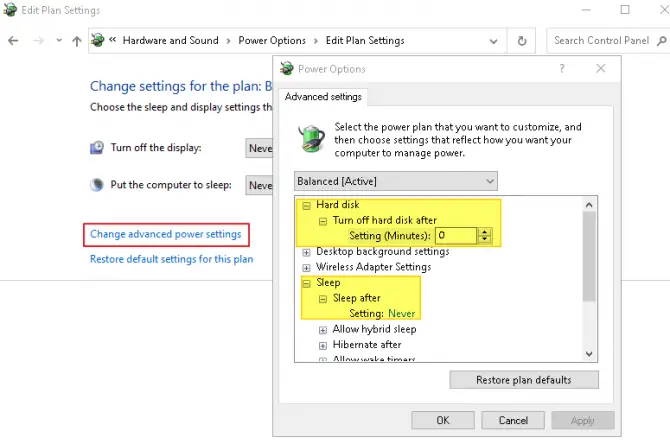
Some kernel power 41 errors can be caused by the “turn off hard disk” feature in your power plan. To disable this, do the following.
- In your computer’s search menu, type in “power options” and choose it from the best match results. If it isn’t there and there is “power and sleep” choose this and choose “additional power settings” from the right-hand side of the screen under related.
- Now click on the blue link, “change plan settings” option beside your enabled power plan.

- Now click on the blue link, “change advanced power settings”.
- Find “hard disk” in the menu and turn it off by typing in “0” into the box. Make sure to hit apply!
- Now find “sleep” in the menu and also turn it off by typing in “0”. Make sure to hit apply!
- Hit okay to save your changes and exit out.
5. Turn Off Windows 10 Fast Startup Feature.
The Fast Startup feature allows your computer to boot quicker, but in doing so, could be the culprit behind the kernel power 41 error. Why? Your computer doesn’t actually shut down fully with Fast Startup enabled.
- In your computer’s search menu, type in “control panel” and then click on hardware and sound settings. Choose power options from the list.
- In the left-hand side menu, click on “choose what power button do”.
- Now click on “change settings unavailable” and scroll down and uncheck the “turn on fast startup” feature.
- Save the changes and exit out.

6. Check for Faulty Hardware.
There are certain circumstances that can lead to faulty hardware. If you have faulty hardware and are unaware of it, it could be causing the kernel power 41 error without you knowing. What kind of hardware problems can cause this error?
- If any of your hardware is overheating or overclocking, it can cause random restarts as the motherboard tries to protect itself.
- If your RAM has dust on it or in it when it is seated, the dust being in the slots could cause problems with the RAM reading properly. This can lead to reboots due to inaccessible memory.
- If the power connectors for the dedicated graphics card or the motherboard are wrong, misaligned, or frayed – this can cause issues.
- If your power supply has oxidation on it, is overheating, or is failing due to being old, this can cause the kernel power 41 error.
If you find any problems with the above, make sure to fix them immediately. Try reseating the RAM, reconnecting the power cables, or replacing any hardware that is overheating or is old. You may also want to try replacing the fans in the computer if they are gunked up with lint and dust, and you don’t have compressed air to clean them.
7. Disable Automatic Restart in Advanced System Settings.
If you don’t believe that there is anything wrong with your hardware, the next step would be to disable the automatic restart option. This option will have your system restart automatically when it encounters an error.
- In your computer’s search bar, type in “advanced settings” and go to “view advanced system settings”.
- Along the top of the new window popup, find the “advanced” tab and click on it.
- Under the third section, “startup and recovery” click on the settings button.
- Under “system failure” uncheck the automatic restart option and hit okay to save the changes.

Advanced Settings 
Uncheck Automatic Restart
Keep in mind that if you choose this method, you will have less random restarts which may help with the kernel power 41 error but, the computer won’t restart to try and rectify any new errors that come up.
8. Recently Updated Your System? Uninstall.
While updating your system is always a good idea, sometimes there are bugs that come with new releases. If you did not have the kernel power 41 error prior to updating your system, you can try uninstalling the most recent update to see if that fixes the issue.
- Hit the Windows Key + I on your keyboard to open settings.
- Click on the “update and security” option from the window.
- Click on the blue link, “view update history”.
- Click on the uninstall updates link.
- Uninstall only the most recent updates and then restart your system.

9. Update Your BIOS.
Only do this if the above methods have not worked for you and you are comfortable with the technical knowledge needed to flash your basic input/output system. In order to update your BIOS, you will need to have access to your motherboard’s instruction manual, as it will detail out how to update your BIOS without causing permanent damage to the system. If you do not know how to update your BIOS or are not comfortable completing this step, you can call your motherboard manufacturer support line to see if they can walk you through the steps.
Fast startup isn’t an option for me in that area.
Hi, I have been plagued for months with my windows10 desktop freezing up whenever I do system shutdowns for a couple hrs & tries to boot it up, after awhile, the display got garbled up & freezes. I have no choice but to push the power button, hold it there until windows shuts down & resets. Often times, the pc will beep continuously & refuses to boot up. I need to leave it alone for at least 3 hrs or more before it starts up ok…at times, the display gets garbled up again & I have to redo the entire procedure again.
How do I go about troubleshooting it? All drivers have been updated & checked out ok.
Didn’t work.
I installed Win 10 afresh, updated all drivers, looked for duplicate ones, there weren’t any. But the machine still shuts down in exactly 30 minutes from when the power is turned on.
Then installed Win 8.1 afresh, that came with the machine, but it still shuts down in 30 minutes.
Then updated BIOS, and even with BIOS screen, it shuts down exactly in 30 minutes.
It seems neither Microsoft, nor Sony, nor Intel have thought of fixing this.
Could be hardware related… Maybe something is overheating ?
I am facing the same problem and the hardware is also working fine. Any solution
I installed Windows 7, Windows 10, Android, Ubuntu. It does the same thing in all of them. As you said even with the BIOS screen. The only difference is my laptop turns off exactly in 9 minutes and 56 seconds. Never one second less or more. I searched the whole internet and I got nothing.
I replaced the HDD with SSD, still same. My laptop is Fujitsu T901. The problem is I cannot find another one. If I could, then this one is going into trash…
i’ve:
Replaced my PSU with a new 850W Gold
Updated all my drivers
Updated my Bios
Ran Memtest over night (8 passes)
Ran Prime 95 over night
Reseated my Ram
Reapplied my paste
Reinstalled Windows
Reinstalled Windows (through a completely fresh install)
Heat on RAM runs about 50C in game
GPU runs about 68C in game
CPU runs about 62C in game (all liquid cooled)
I still get this BSOD when I play some games
hi, have you found any solution?
GPU and CPU temp’s are way too high for a liquid cooled system. I have mine overclocked and CPU it doesn’t even reach that high! the max it hits is 54c in games under load and GPU hits 34c under load on games like war zone and Elden ring both are very CPU/GPU demanding games
everyone says its a power or PSU issue! but I feel the motherboard is the issue because power has to go to board then transfer to all other components so once windows reads a error or the motherboard snags resistor error, it will freeze or give BSOD as whea_uncorrectable_error or clock_watchdog_timeout
There is a known issue with EVGA Supernova GA power supplies if you are using an RTX 30 series card. So if you have that power supply and a 30 series card, that’s likely the cause of this error.