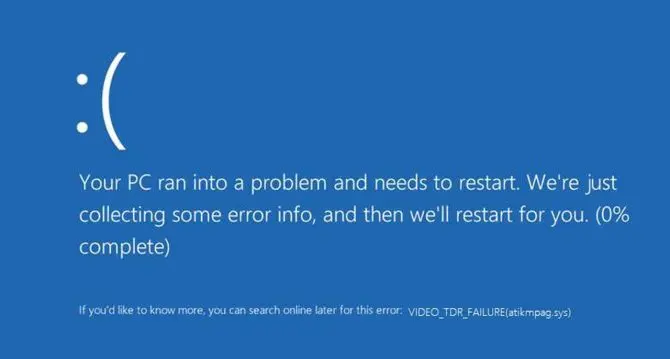
After installing a new version of Windows 10, installing a new video card driver or just like a bolt from the blue, we may be greeted by a dreaded Blue Screen of Death (BSoD). A BSoD can be caused by many problems. For example, driver faults, memory faults, wrong system files or hard drive issues. In case of the “video TDR failure” message that usually comes with the error code 0x00000116, we likely have to deal with a driver’s fault or a system file problem.

What is a “video TDR failure”?
TDR stands for Timeout Detection and Recovery. TDR is good for us because it pays attention to the operations of the video card and the video card driver. If the video card does not answer for a longer time, it tries to solve the problem. In most cases TDR succeeds and your system can recover from the timeout, but sometimes it cannot fix the issue. That’s when the „video TDR failure” error message is displayed in the form of a BSoD. When you are working on tasks that require high performance from your video card, such as video editing, 3D modelling, or playing games, it may happen that your video card does not answer to a particular request. If this happens multiple times one after another, the TDR functionality will be unable to deal with it and as a result the system will throw a BSoD error.
5 solutions to fix the “video TDR failure” BSoD error
Based on descriptions from the people of the internet, the 0x00000116 error can occur in two ways. The more frequent version is when while using the computer, without any presage, we find ourselves in front of a BSoD. The other, less common case is when immediately after starting the machine, the video TDR failure BSoD appears before we could do anything. The essential difference between these two is that in the second case we can’t access Windows. This makes dealing with the error a little bit harder, but no need to worry, there is a solution.
If you receive the error as written in the first case mentioned above, which means you can access Windows, just skip the next section about Windows Safe Mode and start from the troubleshooting instructions below that.
On the other hand, if you can’t access Windows because the BSoD screen is the first that you see after starting your machine, then the first step you need to do is to start Windows in Safe Mode. In order to do that, follow the instructions in the next section.
Starting Windows in Safe Mode
Windows Safe Mode is a system made for troubleshooting. In Safe Mode, Windows, among other things, doesn’t load drivers, which is actually useful for us since this lets you to bypass the error message.
Here is how to enter Windows Safe mode:
- Press the power button continuously for 10 seconds to turn your machine off.
- Press the power button once to start your computer.
- Press the power button continuously for 10 seconds as soon as you start seeing the first lights on your screen to turn your machine off.
- Press the power button once to start your computer.
- Press the power button continuously for 10 seconds as soon as you start seeing the first lights on your screen to turn your machine off.
- Turn your machine on again with the power button.
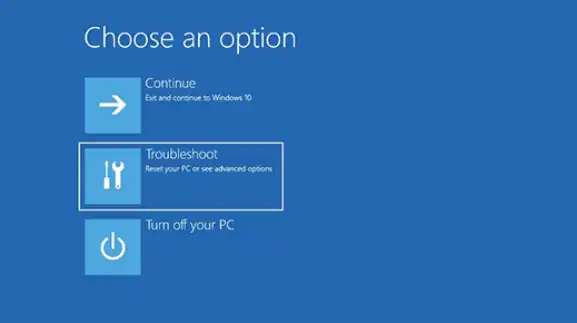
- Now let it start up as usual, and your computer will enter the winRE environment.
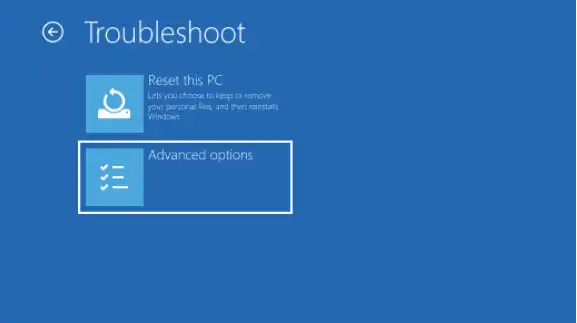
- From the appearing options choose Troubleshoot.

- Choose Advanced Options.

- Select Startup Settings.

- Then click on Restart.

- When your machine restarts, a list of options will appear. Choose the one which says Safe Mode With Network Connection to start Windows in Safe Mode.
Update your VGA driver
Most of the time the 0x00000116 error is caused by an outdated video card driver which is no longer compatible with the Windows operating system. It’s always worth it to keep your drivers updated as updates in the majority of cases bring performance increase, better security and eliminate errors like the “video TDR failure”.
Here is how you can update your VGA drivers in a few easy steps:
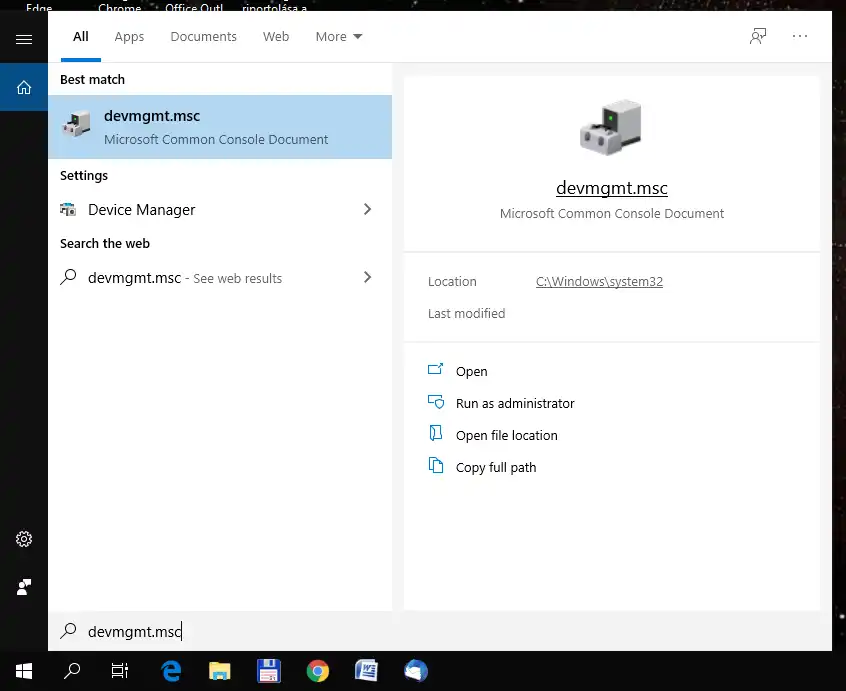
- First of all, open the Start menu and search for “devmgmt.msc” then press Enter, this will start the Windows Device Manager.

- Expand the Display adapters menu item to reveal the video card.

- Right-click on the name of the video card and select the Update driver option from the drop-down menu.

- A new window will appear to guide you through the driver update process. When asked how you want to search for drivers, select the Search automatically for updated driver software option.

At this point, Windows will look for the latest driver software available online and install it. Once the process has finished, restart your computer and test if the error has been resolved. If not, move on to the next section for additional solutions.
Note: If you were following the steps in Safe Mode, make sure to enter into Safe Mode again when you restart your machine.
Uninstall and reinstall your video card driver
It can happen that updating the video card driver doesn’t solve the problem because the source of the problem is in a file that is not overwritten by the new update. In this case, you have to uninstall the video card driver, then download and install the latest version from the official website of the manufacturer.
Here is how to uninstall:
- Open the Windows Device Manager the same way as in the previous section.
- Select Display adapters.
- Right-click on the device and choose the Uninstall device option.
Once this is done, download the latest version of the driver from the video card manufacturer’s website. Most likely it’s going to be one of these three:
- Nvidia: http://www.nvidia.com/Download/index.aspx
Select the type of your video card, click on the search button, then download the driver. - AMD: http://support.amd.com/en-us/download
Choose Graphics option from the first column of the chart, select the type of your video card, press search, then download the video card driver made for Windows 10. - Intel: https://www.intel.com/content/www/us/en/support/products/80939/graphics-drivers.html
Click on Get started, then click Download now.
When you have successfully downloaded the driver, install it and restart your computer. Hopefully, this will solve the 0x00000116 error.
Replace a specific driver system file with a backup file (for AMD video cards only)
If you are using an AMD video card, the “video TDR failure” can’t be solved in all cases by the previous two methods. It is because the AMD video card driver does not necessarily write all the important system files over, even after a complete re-installation. Therefore, you have to overwrite them manually with a backup version set aside by Windows.
The file in question is called atikmpag.sys (AMD multi-vendor Miniport Driver), which is a driver software made by Windows. It is responsible for establishing the connection between the computer and the AMD video card driver. (Yes, you need a software to connect the software, which connects the machine to your video card, to your machine. Huhh. It was at least as difficult to write down as to understand.)
To overwrite the file manually:
- First of all, go to C:\windows\drivers\ and look for the file atikmpag.sys
- Rename this file to atikmpag.sys.old by right-clicking it and selecting Rename. You could simply just delete it, but I suggest you not to do so because if you run into any kind of problem during this process, it will be better to have the original one.
- After renaming the file, you need to replace it with the backup made by Windows. Go to C:\ATI and find the file named atikmdag.sy_, then copy it to the Desktop.
- Open the Start menu, type “cmd” in the Search bar and choose Run as administrator.
- Type or copy-paste the following command, then press Enter: “chdir desktop”
- Next, type or copy- paste “expand.exe atikmdag.sy_ atikmdag.sys”, then press enter.
- When you are done, move the file from the Desktop to C:\windows\drivers\
When you have completed the above steps, reboot your system.
Fix hard drive issues
The “video TDR failure” can also be caused by a hard drive problem. In that case, Windows can’t access driver files or can only access corrupt ones. Fortunately, there is a pretty easy solution to fix this issue. All you need to do is execute a hard disk repair command via the Windows Command Prompt, and the operating system will scan your hard drive and repair the corrupt sectors that it finds.
Here is how to do this:
- First of all, open the Start menu and search for “cmd” (Command Prompt), then click on the Run as administrator button.
- Type or copy-paste the “chkdsk /f /r C:” command in the Command Prompt, then press Enter. (In the command, “C:” is the drive letter of the partition that the command will check. This is the default value for the operating system, but if your Windows OS is located on another drive, replace “C:” with the letter of that partition.)
- When the systems asks you to confirm starting the scan, press the “Y” key and hit Enter.
- Let the scan run and fix any potential hard drive issues.
- When the process is completed, restart your computer.
Read the dump file
If nothing helped so far, the issue is certainly more severe in your case. To find out what exactly the problem is, you can use something called a “dump file”. Dump files are similar to log files, made by Windows each time it crashes. From these, it is possible to extract which file was the cause of the crash.
There are three types of dump files:
- Complete Memory Dump
- Kernel Memory Dump
- Small Memory Dump
You will need the “Small Memory Dump” for now. The advantage of that one is that it doesn’t take up too much space, but it still has all the information that we need.
First, you need to configure Windows to create a dump file the next time it crashes:
- Open the Start menu and type “sysdm.cpl” in Search, then press Enter. By doing so, you open the System Properties window.
- Go to the Advanced tab and under the Start-up and Recovery section, click Settings. that is under the part of Startup and Recovery.
- In the Write debugging information section, click on the drop-down menu and choose the Small Memory Dump (256 KB) option.
- Press OK to save your changes.
The dump file will be created in the C:\Windows\Minidump folder as a default setting.
When your computer encounters the “video TDR failure” error again, you need to check the generated dump file to figure out what is causing the error in your specific case. Unfortunately, dump files can’t be simply read in a text editor. You need to have a software that “translates” dump files into a readable format. NirSoft made a free software, called BlueScreen Viewer that can do just that. You can download it from the official site of NirSoft: https://www.nirsoft.net/utils/blue_screen_view.html#DownloadLinks
After installing BlueScreen Viewer, open the dump file and the software will highlight the driver file that caused the crash. In most cases, the file name won’t match the real name of a driver. To find out which driver you need to fix, do a Google search with the file name given and look for solutions on how to repair that particular driver.
We hope that you succeeded in fixing the “video TDR failure” error. Let us know which method worked in your case in the comment section below.