There’s almost nothing more frustrating than painstakingly slow internet. As we users become more and more drawn to the technology that will deliver the content we’re seeking as quickly as possible, it’s hard to even imagine even the slightest unexpected delay.
If this is a familiar feeling with your Windows 10 operating system, you’re definitely not alone. The OS has become one of the most widely used in the world with more than 400 million installations, and a sizable portion of its users have filled various troubleshooting forums hunting down the tried-and-true methods to speeding their slow internet on Windows 10 up again.
How do you know your internet is slow?
Everyone knows slow internet when they see it, but your computer won’t explicitly provide you with an error message indicating it. Instead, the connection speed will likely give itself away when you click on a link that takes more than a few seconds to load. Or when a YouTube video is repeatedly buffering, leaving you staring down that eternally spinning wheel. Maybe you’re on a Zoom call in which everyone keeps freezing, and you’re told, “Your internet connection is unstable.”
Regardless of these telltale signs, a quick internet speed test will give you a measurable indication of your connection stability. This speed is determined by how much data your connection is able to download or upload per second, shown as bits per second (bps). Internet connections transfer thousands of bits–the smallest unit of data–per second, and we use the prefixes k, M, and G to indicate larger quantities of bits.
As for internet speeds, you’ll notice that Mbps is more standard than kbps or Gbps in either download or upload speeds. A broadband connection, which can be considered the national internet “speed limit,” has a minimum download speed of 25 Mbps and minimum upload speed of Mbps.
While broadband speeds can serve as a standard, know that a good internet speed usually sits at or above 25 Mbps, allowing you to enjoy browsing, downloading music, online gaming, and HD streaming with minimal or no interruption.
Why you might experience a slow internet
Windows 10 first launched in 2015 and packed a punch with its grand bundle of new features. While appealing in usability and functionality when placed next to older Microsoft operating systems, its busyness demands a considerable amount of a system’s resources and network bandwidth.
Windows 10 subtly runs many background processes and services at once, which inherently reserves a portion of your valuable Internet bandwidth for auxiliary features you may not need at all times.
Slow internet on a Windows 10 computer is not an unsolvable problem. Read ahead for a handful of troubleshooting methods to get your connection back up to speed.
How to fix a slow internet on Windows 10 in 7 easy steps
1. Close running background applications
If you have multiple applications open in the background, not only your Internet bandwidth but battery will be drained much quicker than usual. Running Skype, anti-virus software, and even stagnant browser tabs while gaming, streaming, or conducting any other kind of bandwidth-burdening activities will affect the functionality of your computer.
While you can quit all open background apps, you can also specifically sift out the ones that are slowing your internet speed the most:
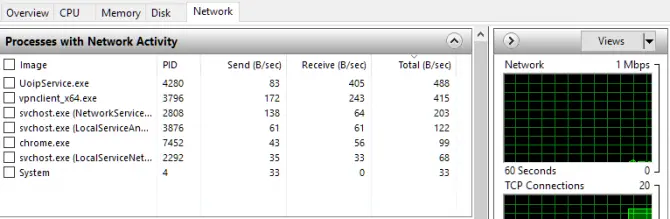
- Select “Task Manager” after typing it in the Windows 10 search bar.
- Go to the “Performance” tab.
- Click on “Open Resource Monitor” on the bottom.
- Select “Network” tab.
- Right-click on the apps or programs with higher send/receive requests and select “End Process”.
2. Adjust your network bandwidth settings
Windows 10 will automatically reserve about a fifth of your total internet bandwidth for system-related programs. Fortunately, there is a way to customize the default settings to best serve your web-surfing needs:
- Select the “Run” app after typing it in the Windows 10 search bar.
- Type “gpedit.msc” and press “OK”.
- Select “Computer Configuration”.
- Find and open “Administrative Templates”
- Select “Network” and then “QoS Packet Scheduler”
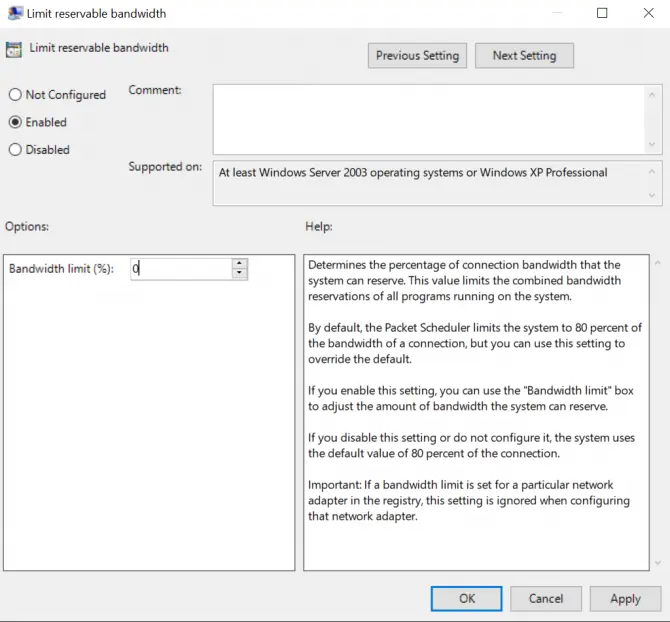
- Select “Limit reservable bandwidth”.
- Using the enabled radial, change the bandwidth limit from 100% to 0%.
- Hit “OK”.
3. Schedule or pause Windows 10 updates
While helpful for the forgetful, Windows 10’s automatic update function is yet another program that is capable of staying active in the background and consuming precious network bandwidth. Of course, keeping your OS up to date is important for the prime functionality of your PC, but this feature can be temporarily disabled to avoid unnecessary update checks and downloads:
- Open “Settings” by typing it in the Windows 10 search bar.
- Click “Update and Recovery” and then “Windows Update”.
- On this screen you can adjust your active hours when you don’t want Windows to perform an update, or you can even pause updates completely for a few days.

4. Disable Large Send Offload (LSO) feature
Large Send Offload (LSO) is a recent Windows 10 feature that is intended to improve overall network performance. Ironically, the feature enables background applications to run and consume network bandwidth, ultimately slowing the speed of your connection. However, like the other items on this list, it can be disabled:
- Open the “Device Manager” by typing it in the Windows search bar.
- Expand “Network Adapters” by clicking the arrow next to the icon.
- Select the Network Card that you are using to connect to the internet and double-click it.
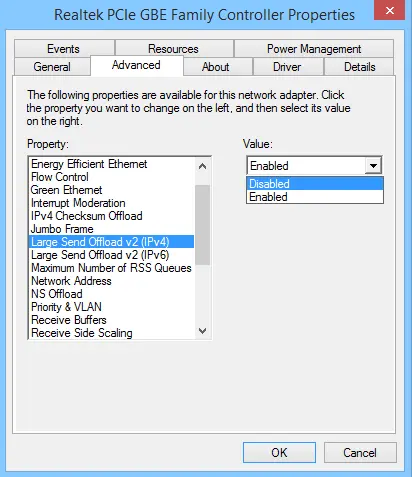
- Go to the “Advanced” tab and then click on the “Large Send Offload V2 (IPv4)” item in the list.
- Change the “Value” setting on the right to “Disabled“.
- Do the same for Large Send Offload V2 (IPv6), if available.
- Click “OK” to save the changes.
5. Disable the Peer to Peer (P2P) update process
Like the Large Send Offload (LSO) feature, the Peer to Peer (P2P) update process can drastically slow your internet connection. This allows your computer to share Windows updates with other computers via the same server, all while compromising your speed after a recent update.
An interesting feature, nonetheless… but here’s how to disable it:
- Open “Settings” after typing it into the Windows 10 search bar.
- Select “Update and Security”.
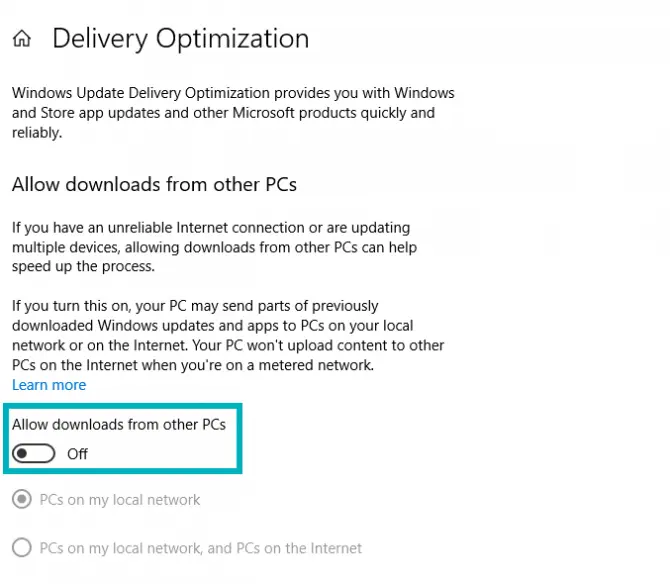
- Click “Advanced Options” and then “Delivery Optimization”.
- Switch the blue toggle from On to Off for “Allow downloads from other PCs”.
6. Update your WiFi drivers
Drivers are software that enable your computer’s hardware to work together, but using wrong or outdated WiFi drivers can be the cause for slow connection speeds.
Doing this manually can be a trying and time-consuming task for someone without the technological expertise, so it can also be done automatically with many online programs. However, if you’re up for the challenge, here are the necessary steps:
- Open the Command Prompt (Win + R, type “cmd”).
- Enter the command: netsh wlan show drivers
- Determine which wireless driver is being run on your PC, including its date and version.
- Copy the driver name and paste it into the Google search bar.
- Download the latest available driver for your Wifi adapter from the manufacturer website as a file to your Desktop.
- Run the installer and install the driver.
- Reboot your PC after the installation finishes.
7. Disable Windows Auto-Tuning feature
Windows 10 Auto-Tuning is another new feature that allows for more efficient data transfers, but it can simultaneously interfere with a stable connection. Here’s how to disable it:
- Press the Windows logo key and type “cmd”.
- Right-click on the Command Prompt and click “run as administrator”
- Select “Yes” when asked to confirm.
- Type in the following command and press Enter: netsh interface tcp show global
- If “Receive Window Auto-Tuning Level” is set to Normal, you need to disable it.
- Type in this command and press Enter:
netsh int tcp set global autotuninglevel=disabled

Conclusion
Technological issues can often stump those easily intimidated by an especially slow internet; but with patience and attention to detail, it’s rather easy to return to the normal speed of your internet connection.
Whether it’s as simple as decluttering the amount of running programs at a given time or diving into the inner workings of your PC by updating outdated drivers, there are countless ways to circumvent the issues posed by a newly updated operating system.
As you proceed with your troubleshooting efforts, be sure to consult the handy internet speed test as a reliable indicator of your problem-solving.