Computers run on software, which is comprised, ultimately, of bits, or 0’s and 1’s. That would not be very fun to look at, so already in the 70’s, special graphic circuits were used to show images to the user. The term “GPU” (Graphics Processing Unit) was coined in the 90’s. A GPU is nothing but a specialized chip working only on graphics rendering, unlike a CPU (Central Processing Unit), which is responsible for general computing tasks.
Nvidia has been at the forefront of graphics development since the 90’s. Their products are popular with gamers, graphic designers and other creatives who need serious graphic power. In this article, we will explore how to make sure your Nvidia GPU is at peak performance by keeping drivers updated.
What is the Nvidia graphics driver?
Drivers are small pieces of software that create a connection between your computer and its components or external devices. Basically, they tell the computer how to control these devices. In this case, the graphics driver makes sure your computer can control the Nvidia GPU, commonly known as a graphics card or video card.
Every GPU model has its own driver, which can be found on Nvidia’s website. Drivers are regularly updated, and you are advised to always use the most recent ones.
Why do you need to have updated graphics drivers?
Every component and device (such as printers, headphones, mouses etc.) have their own drivers the computer needs to communicate with the device. Modern devices can find, download and update their own drivers via the internet, but it is still useful to know how to do it manually, in case the process runs into a problem.
Outdated drivers might cause the following problems:
- GeForce error code 0x0003
- Nvidia control panel not opening
- Nvidia container high CPU
- apps or games crashing
- suboptimal graphics performance
- screen freezing
There is really no good reason to not keep your drivers updated.
5 ways to update your Nvidia graphics drivers
Automatic update
- Click on Start>Settings and choose Update & Security.
- Click on Check for Updates.
This will prompt Windows to search for updates and any graphics drivers will also be updated.
From Device Manager
- Type “Device Manager” in the search bar and open Device Manager.
- In Device Manager, double-click Display adapters, and then double-click the name of the device running NVIDIA Graphics Driver.
- Click the Driver tab, and then click Update Driver.
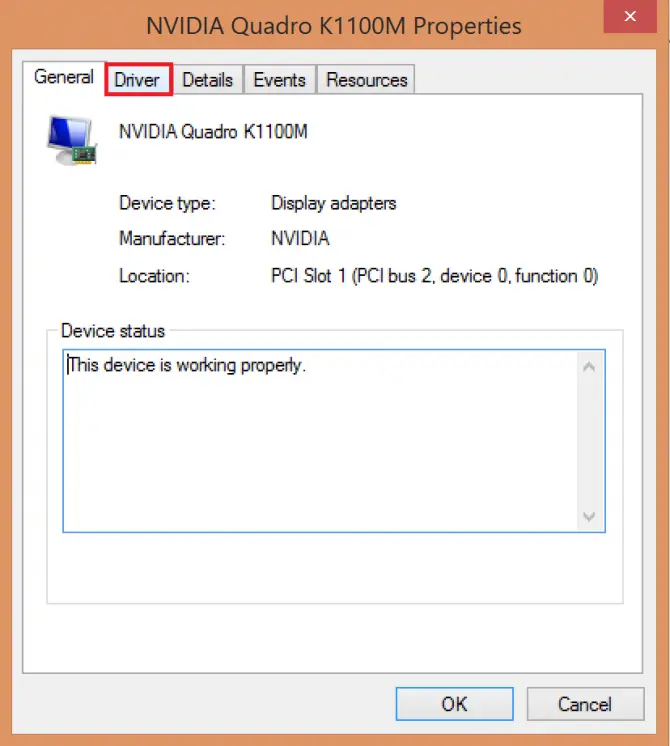
- When asked how you want to search for driver software, click Search automatically for updated driver software.
- Windows will locate and install a new driver if one is available.
Manually downloading from the Nvidia site
- Check the model of your NVIDIA Graphic driver. You can find this in by typing “Device Manager” in the search bar.
Choose Display adapters.
In the drop-down menu, you should see your GPU.
- Visit the official website of NVIDIA downloads. You need to select the correct Product Type, Product Series, Produce Model and Operating System. Click on Search.
- Click on Download.
- If your browser asks you if you want to Run or Save the file, choose Save. This ensures that the file is not saved in a temporary folder and will remain accessible as you install the driver.
- Right-click on the .exe file you downloaded and choose Run as administrator.
- Follow the on-screen instructions to install the driver.
Through Nvidia Control Panel
Nvidia Control Panel is a program that helps manage Nvidia devices. You can use it to update your driver, among other things.
- Click on Start>Settings, then choose Nvidia Control Panel from the list.
If you have a GEForce or ION GPU, you can also just click on the Nvidia Update icon on your Windows system tray.
- Find the Help tab.
- Choose Updates.
- On the Preferences tab, you can choose if you want automatic or manual updates, and you can search for driver updates as well.
Using GeForce Experience
GeForce Experience is a companion software that serves mostly gamers by allowing them to take screenshots and recordings of their gameplay. You can also change some settings through this software. Here is how you do it.
- Open NVIDIA GeForce Experience.
- Navigate to the Drivers section.
- Select Re-install the driver option and choose Quick install.
- Follow the instructions on the screen to complete the reinstall process.
Conclusion
Graphics drivers are components we don’t usually think about until there is a problem. Hopefully, this article was helpful and you will always know what to do when your driver needs an update.
We have also published a dedicated article on how to fix the “NVIDIA installer cannot continue” error if you run into it during the driver update process.