The internet is our way of connecting to each other and accessing information. It is therefore frustrating when a website greets us with the “err_connection_refused” error message in Google Chrome:
The heading of the error message screen will either say “This site can’t be reached” or “This webpage is not available”. This error is specific to Google Chrome. It is not particularly helpful, as it does not tell us what the reason for this problem is. All we know is that our browser cannot access a certain website. This can be caused by a number of mishaps, such as:
- the website being down (although this is rare)
- incorrect firewall settings
- browser cache issues
- incorrect system settings
- malware
- weak internet connection
There is no easy way to know what is causing the error, but fortunately, a large number of solutions exist. Try them one by one until the error is cleared.
Check if the website is down
Try accessing a different website from Chrome. If this works, you know that there is an issue with the site you were trying to visit. In this case there is not much you can do but be patient.
You can also try Down For Everyone Or Just Me, which is a site specifically designed to answer this question.

Just enter the site you were looking for in the search box and click “or just me?”. This should tell you whether it is worth trying further options.
Restart your router
It is possible that the error is caused by your faulty internet connection. It is quick and simple to check for this. Just unplug your router’s power supply, wait for 30 seconds, then reconnect.
Try accessing the page again. If this didn’t fix the err_connection_refused issue, it’s time to try different solutions.
Clear the Chrome cache
Cache is a storage for browsing data Chrome collects while you are using the internet. Browsing history, login data and cookies are saved to make the sites load faster the next time you come back.
This data becomes obsolete, though, which is when cache might cause issues. If this is the case, it is time to clear the cache.
First, try accessing the same site in incognito mode by pressing Ctrl+Shift+N. If the error persists, take the following steps:
- Click on the Menu button, then select More tools, then Clear browser data. Make sure all 3 boxes are checked, and set the time range to All time. Click on Clear data.
- If this did not clear the error, there is probably something wrong with the settings. Try the following options.
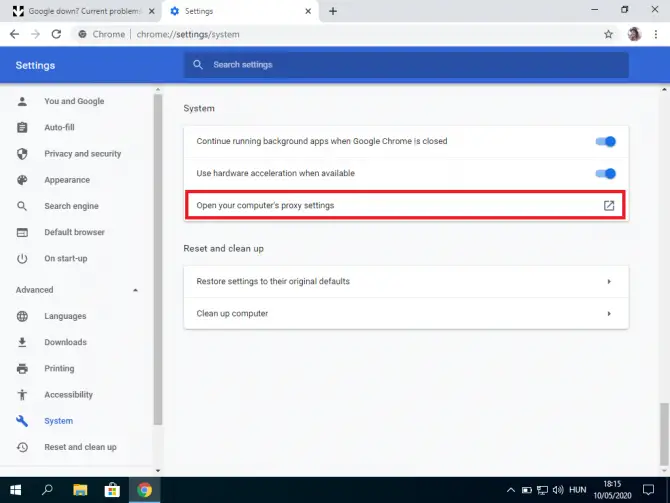
Check your proxy settings
Proxy servers help you protect your privacy by acting as an intermediary between your browser and other web servers. They allow you to go online while keeping your IP address secret, and filtering communication between servers.
However, the web server might reject the proxy server based on its IP address, leading to the err_connection_refused error. Even if the proxy is functioning correctly, faulty configurations or errors are possible. This is why it’s worth checking the proxy status.
Chrome has an easy way for you to do that.
- Click on Menu>Settings.
- Choose System under Advanced.

- Click Open proxy settings. This will take you to the settings of your computer.
- Toggle the Use a proxy server into Off.

Check if the err_connection_refused error persists. If so, you will need to dig deeper into your computer’s settings.
Disable Firewall and Antivirus temporarily
Sometimes it is the firewall software that flares up and prevents you from accessing a site. If you trust the site, you can try disabling this protection temporarily. Here is how to do it in Windows 10:
- Type “firewall” in the search bar and click Open.
- Click Turn Windows Defender Firewall on or off.

- Uncheck Block all incoming connections under Windows Defender Firewall.

- Click OK. Check if you can install the update now. If this is not the case, repeat the steps, but instead of unblocking connections, disable the firewall entirely.

If you are using a third party antivirus, disable that too, then check if you can now access the desired website. If this didn’t solve the err_connection_refused problem, time to look at your computer’s settings.
Clear DNS cache
This method resets the IP address configurations of your computer. If the error you are trying to solve is caused by the website’s change, clearing the stored data from your operating system might help.
- Type „cmd” in the search bar at the bottom of the screen.
This brings up the Command Prompt, which is an application where you can give direct commands to your computer.
- Click „Run as administrator”.

The command line shows up.
- Type „ipconfig/flushdns” and hit Enter.

This flushes the DNS cache and should then give you the message „Successfully flushed DNS Resolver Cache”.
- Then type „ipconfig/release” and hit Enter.

This causes the DHCP (Dynamic Host Configuration Protocol) server to take away the IP address assigned to your computer. We will get it back in the next step.
- Now type „ipconfig/renew” and hit Enter. This makes the DHCP server assign your computer a new IP address (quite possibly the same as the old one).

You can close the command prompt now. Try if the error has cleared. If this is not the case, you might have to change your DNS server, as it may have gone offline.
Change the DNS server
- Click Start>Settings>Network & Internet.
- Select the type of connection you have (if you are not sure, check the Status menu).
- Click „Change adapter options”.
You might see several connections.
- Right-click the one you are using, then choose Properties.
- Choose the Internet Protocol Version you have (IPv4 or IPv6). After you made your choice, click Properties.

- Change the radio button selection to „Use the following DNS server addresses” then insert the address of your chosen DNS server and press OK.
Some good and free DNS options include Google (8.8.8.8 and 8.8.4.4), OpenDNS (208.67.222.222 and 208.67.220.220) and Cloudflare (1.1.1.1 and 1.0.0.1). If you have been using one of these and you still got this error, try reverting to your internet provider’s default server, as sometimes that might fix the issue.
You have changed your DNS server. Try accessing the desired website now. If it still doesn’t load, you can change some Chrome settings.
Disable Chrome extensions
Chrome extensions are usually created by third parties, not by Google itself. This means that not all of them are reliable.
- Click on the Menu button, then choose More tools>Extensions.

Make sure all your extensions are up to date.
- Disable all of them, then check if the website loads. If it does, one of your extensions is to blame. Turn them on one by one to find the culprit, then remove that one.

If this didn’t solve your problem, the best you can do is to reinstall Chrome.
Reinstall Chrome
- In the search bar, type “task“, then click Open under Task Manager.

- In the list of processes, look for any process related to Chrome. If you find any, select it, then click End task.

- Click the Start button, then choose Settings>Apps.

- Find Chrome in the list, select it, then click Uninstall.
A window will pop up, where you have to confirm with the Uninstall button. This will uninstall Chrome, however, there will still be some lingering data. In the next steps, we will delete these.
- Press the Start button, then hit R, and click Open under the Run app.

- Type “ %appdata% “ and hit Enter.

- Select the Chrome folder in the window that pops up, select it, right-click, then choose Delete.
- In the Run window, type “ %localappdata% “ and hit Enter.

- Select the Chrome folder in the window that pops up, right click it, then choose Delete.

- Restart your computer.
- Go to Chrome’s download site and download the installation package.

Double-click the downloaded file, then follow the instructions to reinstall Chrome.
Conclusion
One of these options should have cleared the “err_connection_refused” message. Let us know in the comments what worked for you!