There are numerous errors you may face when using a Windows 10 system. The device not migrated error is a more frustrating one. As good of a system as Windows 10 is, errors like this are quite common.

The device not migrated error may occur for a number of reasons. Before trying to solve the error, let us first see what devices are, what it means to migrate a device, and what might cause a device to not get migrated properly.
Devices on a Windows system
As technology advances, there are increasingly more devices that you can use with your computer. For instance, before the standard Ethernet system was proposed, we used to have many different adapters and network cables. But now, most devices use the same standard cable and have the same ports to fit the cable.
Another example would be WiFi. If you own a desktop computer, there is a good chance that you know there is a WiFi adapter inside your system. For this adapter to work, you have to tell your system the function of the device and what it needs to connect the system to a WiFi network. There are special software programs called drivers to do all this.
You need a lot of drivers if you use a lot of external devices in your system. A computer system, essentially, is the CPU alone. The touchpad, mouse, keyboard, speakers, printers, every other device needs a driver to work.
How to get drivers?
The best approach is to download them from your system manufacturer’s website. Once installed, these drivers provide your system with the capability to use the connected device.
When you install a driver, you need to check its compatibility with your device. Not all devices are compatible with every released driver. Moreover, your OS may not be equipped to deal with some driver software. The device not migrated error is caused exactly by a situation like this.
Causes of the device not migrated error
Whenever you update your operating system, the drivers you previously installed on the system must be migrated to the new updated system. Windows may run into an issue while performing this migration process. If that happens, the system displays the device not migrated error.
Apart from driver incompatibility, file corruption is another potential cause for this error. Although, in most cases, the error is rooted in the improper migration of the device drivers.
Fixing the device not migrated error
Fixing this error is quite simple. Follow the steps given below to find the best and the easiest methods to solve the device not migrated error without any tech support.
Pre-diagnostic measures
Before following any of the methods below, ensure that you have a working backup of your system. Performing a backup using cloud services like Google Drive or One Drive is recommended as the device not migrated error may even be caused by a malfunctioning USB port.
1. Restart your system
Restarting your system is the best solution for many errors. A computer is a very complex machine. It can’t be expect from a machine to continuously work without any issues all the time. To fix any temporary or boot-up issues and refresh your system, it is best to restart it first.
Restarting your system won’t take as long as any of the other methods. It is recommended that you perform a restart first, before trying the next methods.
2. Troubleshoot USB port issues
One of the less-known causes of this issue is a malfunctioning USB port.
To diagnose your USB ports:
- Remove the USB device from the port it is inserted in.
- Clean the device thoroughly using the required equipment.
- Re-insert the USB device into a different port. Continue testing all the ports in your system until you find one that can recognize the USB device.
If none of the ports work, do the same with a different device. If your issue is solved with another new device, the issue is probably with the first USB device.
However, if the issue remains with a new USB device, you most likely have a problem with your USB ports. To remediate this issue, clean the ports thoroughly, then repeat the tests.
If you are not sure how to clean the USB ports in your system, search a video online for your specific computer brand. If you don’t feel comfortable cleaning your computer’s interior, it is best to take it to a computer repair shop for air cleaning and further USB hardware troubleshooting.
3. Fix uninitialized USB hard drives
If you just connected a new USB hard drive to your computer, you may sometimes see the device not migrated error. The reason in this case is most often the uninitialized state of the hard drive. To resolve this problem, you will have to initialize and assign the hard drive following the steps below.
- Type “Device Manager” in your computer’s Windows search bar.
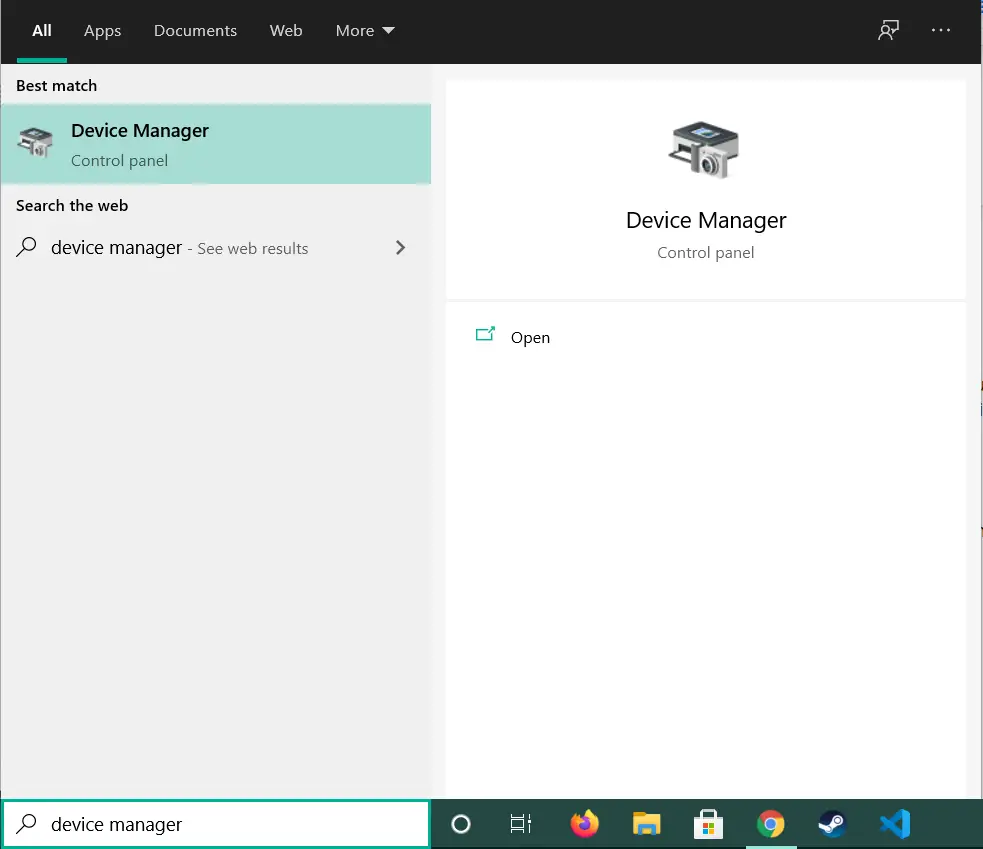
- Click on Open. You will see a window like this one.

- Now, click on the arrow next to “Disk Drives” to view all the disks connected to your system. In the example, we only have one drive connected, so we only see one device under Disk drives.

- Right-click on the newly connected drive, then select Properties.
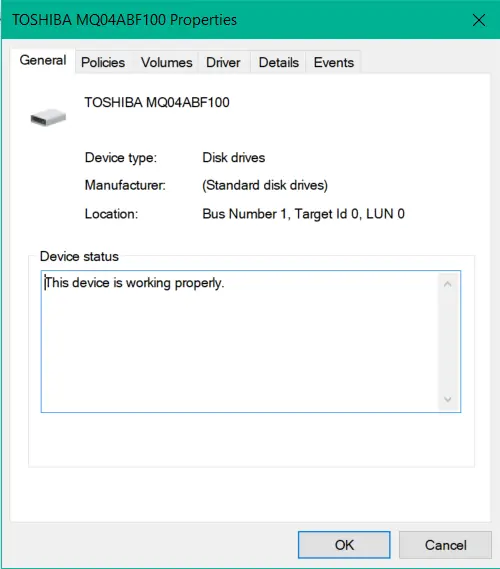
- If your device is not connected properly or not working as intended, you’ll see a different message in the Device status box. If the box says that the device is “uninitialized”, you can initialize the device right there and assign a name to it.
By following this method, you can fix the device not migrated error if it is associated with a USB disk drive.
4. Reinstall drivers for faulty devices
In many cases the root cause of the device not migrated error is driver incompatibility. You can reinstall the specific drivers of the faulty device to solve an incompatibility issue.
Let’s say for example that you have identified that the issue is with the USB camera device. To reinstall the camera drivers:
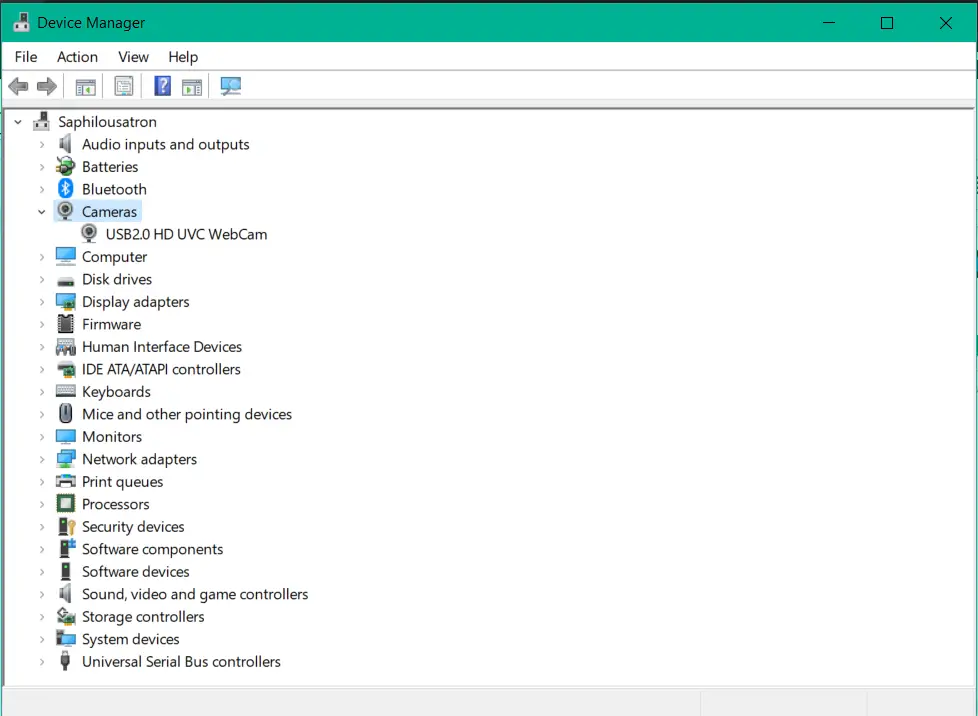
- Type “Device Manager” in your computer’s Windows search bar.
- Click on Open to launch the app.
- Click on the arrow next to “Cameras” in the Device Manager to view all connected camera devices.
- Identify the device that you want to reinstall and right-click on it.

- Select the Uninstall device option.
- Restart your system, and let Windows automatically reinstall the driver.
The Windows OS usually finds and installs the best suitable driver for a device. However, if you are still facing the same issue after a re-install or Windows was unable to find a driver for the device, you will have to install the driver manually. Go to the device manufacturer’s website. Identify the right driver, download it, and perform the install following the steps provided by the manufacturer.
5. Update drivers for faulty devices
Sometimes the error may just be that a driver is not updated to the latest version. To update the faulty device driver, open the Device Manager, and click on the device that needs an update as explained in the method above.
- Then, right-click on the device that needs to be updated.
- In the pop-up menu, click on Update Driver.
- Windows will ask if you want to update the driver automatically or manually. Choose the automatic update first and let Windows search for the best available driver.
If the automatic update is not successful you will need to visit the device manufacturer’s website, download the latest driver from there, and install it manually.
Updating your drivers to the latest versions should resolve most issues. However, if you are still facing the device not migrated problem, continue to the next method.
6. Check your system files
If the above methods didn’t work, then missing or corrupt system files could likely be the cause of the error. You will have to scan your system files to rule out this possibility, and fix any corrupt files that are found.
You can use the System File Checker (SFC) to perform the scan. It comes in-built with the Windows OS and is the best and the easiest way to check for missing or corrupted system files.
Follow the steps below to run an SFC scan:
- Type “cmd” in Window’s search bar.

- Open Command Prompt with administrator access.

- Type in “sfc /scannnow” and press Enter.

- The system will automatically scan all system files and give you the results within a couple of minutes. If your system has a large number of files, it may even take up to an hour to get the results.
After the scan is complete, the system automatically fixes and restores the missing or corrupted files. Make sure to restart your computer before checking if the device not migrated error is resolved.