Nvidia Control Panel is a helpful program that allows you to manage your graphics card settings, such as screen resolution and 3D settings.
Sometimes, however, this program just doesn’t launch. This might have several reasons, such as:
- antivirus settings,
- outdated drivers,
- hung processes,
- etc.
In this article, we are listing some methods that users have successfully used to troubleshoot Nvidia Control Panel. Check them out and let us know what worked for you!
Check that Nvidia Control panel isn’t hidden
It is a ridiculously simple fix that many people overlook. Sometimes Windows simply hides a program, making it impossible to open. Luckily you can easily solve this.
- Type “control” in the Search bar, locate Control Panel and click Open.
- In the window that pops up, select Nvidia Control Panel.
- It should now open. Navigate to the Desktop tab and select both Add Desktop Context Menu and Show Notification Tray Icon.
- This should place Nvidia Control Panel on both your context menu and your system taskbar.
Check if this solved the problem. If it hasn’t, it’s time to check that it is not your antivirus misbehaving.
Check antivirus settings
Some antivirus software (notably AVG) block Nvidia Control Panel. You can change the settings to allow applications. Here is how you do it on Windows 10 Security:
- Click Start>Settings.

- Choose Updates&Security.
- In the menu on the left, choose Windows Security.
- Click on Firewall&Network Protection.
- Scroll down and select Allow an app through the firewall.

- Locate Nvidia Control Panel and make sure the boxes are ticked so the app is allowed through the firewall.
Disable Nvidia Display Container
The Nvidia Display Container is another process that is not vital, but can cause issues like Nvidia Control Panel not opening. We will end this task and also delete the related folder.
- Navigate to the following location: C:\Program Files\NVIDIA Corporation\Display.NvContainer\plugins\LocalSystem\
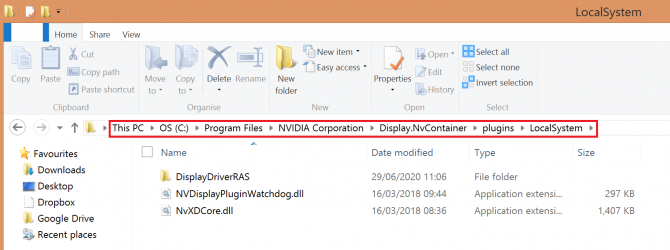
- Right-click the DisplayDriverRAS folder and choose Delete.

- Now navigate to the following location: C:\Program Files\NVIDIA Corporation.
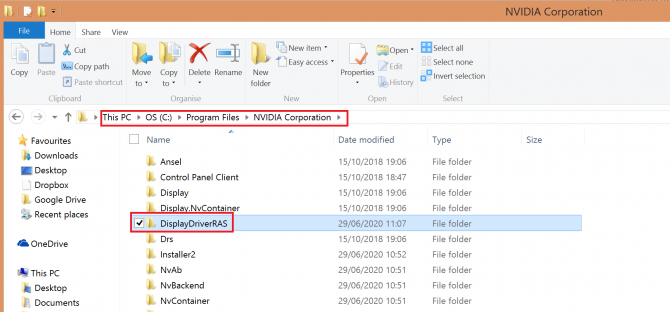
- Locate the DisplayDriverRAS folder, right-click and choose Delete.

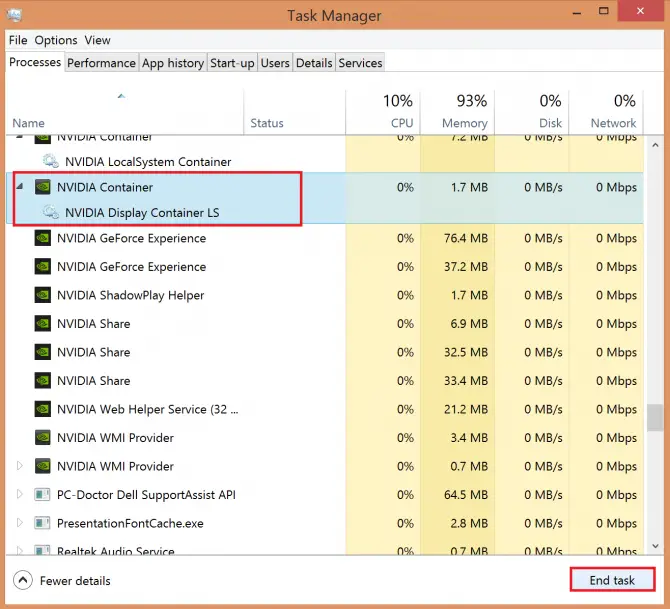
- Open Task Manager by pressing Ctrl+Alt+Del. Find the Nvidia Display Container Local System process, then click End task.
Check if this solved the problem. If it hasn’t, you can still try a number of options, but you will have to tweak your system a little deeper now.
Check that necessary services are running
There are some background services that need to run for Control Panel to run smoothly: the Nvidia Display Container LS and Nvidia Network Service Container.
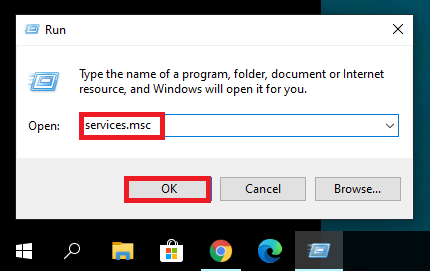
- Type “run” in the Search bar and click Open.
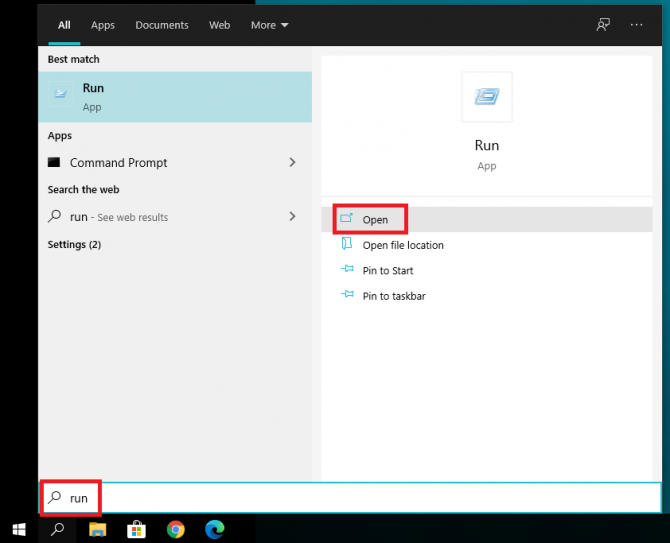
- Type “services.msc” in the Run app and click Open.
- Locate NVIDIA Display Container LS.
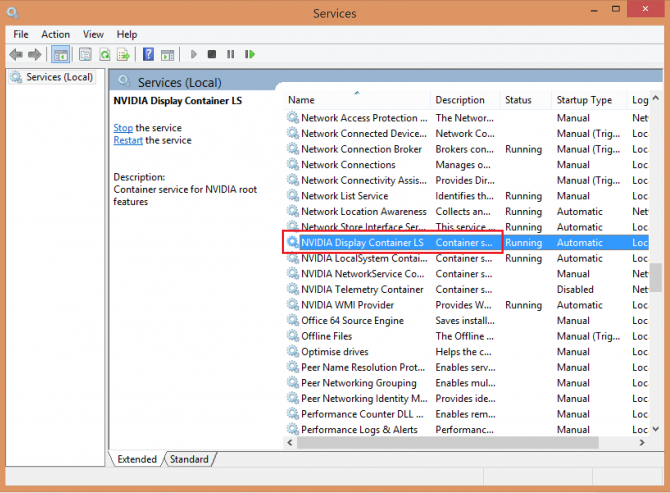
- Double-click it to open Properties. Set Startup type to Automatic, click Start, Apply, then OK.

- Now locate Nvidia Network Service Container and do the same: double-click, set Startup type to Automatic, click Start, Apply, then OK.

- Check if Nvidia Control Panel opens now. If it doesn’t, there are a few more things you can try.
Open Nvidia Control Panel from installation directory
For some reason, even if you can’t open Control Panel from the Start menu, you might be able to open it from the installation directory.
- Navigate to C:\\Program Files\NVIDIA Corporation\Control Panel Client.
- Open the nvcplui.exe file.

- If you want Nvidia Control Panel to automatically start every time you start your system, right-click the file, choose Create shortcut.
- Confirm that you will create the shortcut on the Desktop instead.
- Then go to Desktop, and move the shortcut file to C:\\ProgramData\Microsoft\Windows\Start Menu\Programs\StartUp. This should automate the process.

If the issue is still not resolved, you can try changing some Windows settings.
Disable Fast Boot
Windows 10 has a useful new feature called Fast Boot that – you guessed it – allows your system to boot faster. The price to pay, however, is that the computer never goes to sleep completely, and this might mess with some applications. Try if turning it off fixes your Nvidia Control panel problem:
- Press Windows + S to open Power settings. Choose Power & sleep settings.
- On the right side, under Related settings, click Additional power settings.

- This opens Power Options. Click on Choose what the power buttons do.
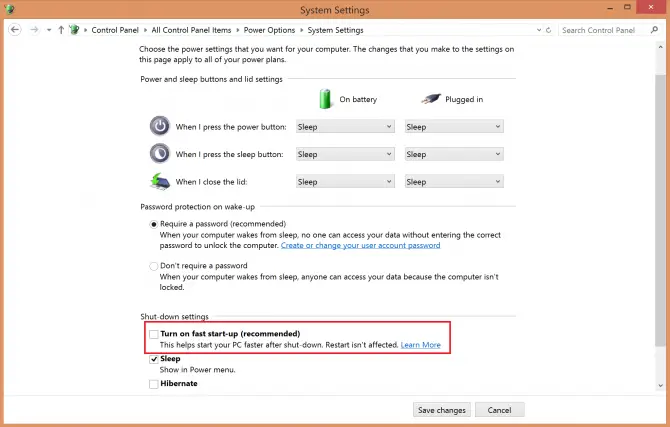
- Click on Change settings that are currently unavailable.
- Uncheck Turn on fast startup (recommended) option and click Save changes.
Check if this solved your problem. Your system might start a bit slower now, but Nvidia Control Panel should open. If it still doesn’t, your drivers might be outdated. Check out our article on how to update Nvidia graphic drivers!
Conclusion
Nvidia Control Panel is a useful program, but sometimes it has its issues. We hope these solutions were helpful and you managed to get it to open. Let us know in the comments!